Google Tag Manager for Performance Marketers: Conversion Tracking, Pixels & Event Measurement
Mid-level marketers targeting Performance Marketing Specialist roles who run paid campaigns on Google Ads and Meta and need to own their own tagging, conversion tracking, and analytics implementation without dev dependency.
- Set up a GTM container, install code snippets, and configure tags, triggers, and variables using the core model
- Deploy a GA4 Configuration tag and create custom event tags for form submissions, scroll depth, and outbound clicks
- Implement Google Ads conversion tags with dynamic dataLayer values to deliver accurate tROAS Smart Bidding signals
- Deploy Google Ads Remarketing, Meta Pixel, and an additional ad-platform pixel with correct standard event mapping
- Diagnose and fix common tag errors using GTM Preview Mode, Tag Assistant, and GA4 DebugView; publish and roll back container versions
- Implement Google Consent Mode v2 to make conversion and remarketing tags privacy-compliant while preserving modelled conversion data
- Audit a GTM container for tag bloat, build a tracking plan spreadsheet, and establish a quarterly maintenance workflow
GTM Fundamentals: Container Setup and the Tag–Trigger–Variable Model
What GTM Actually Does
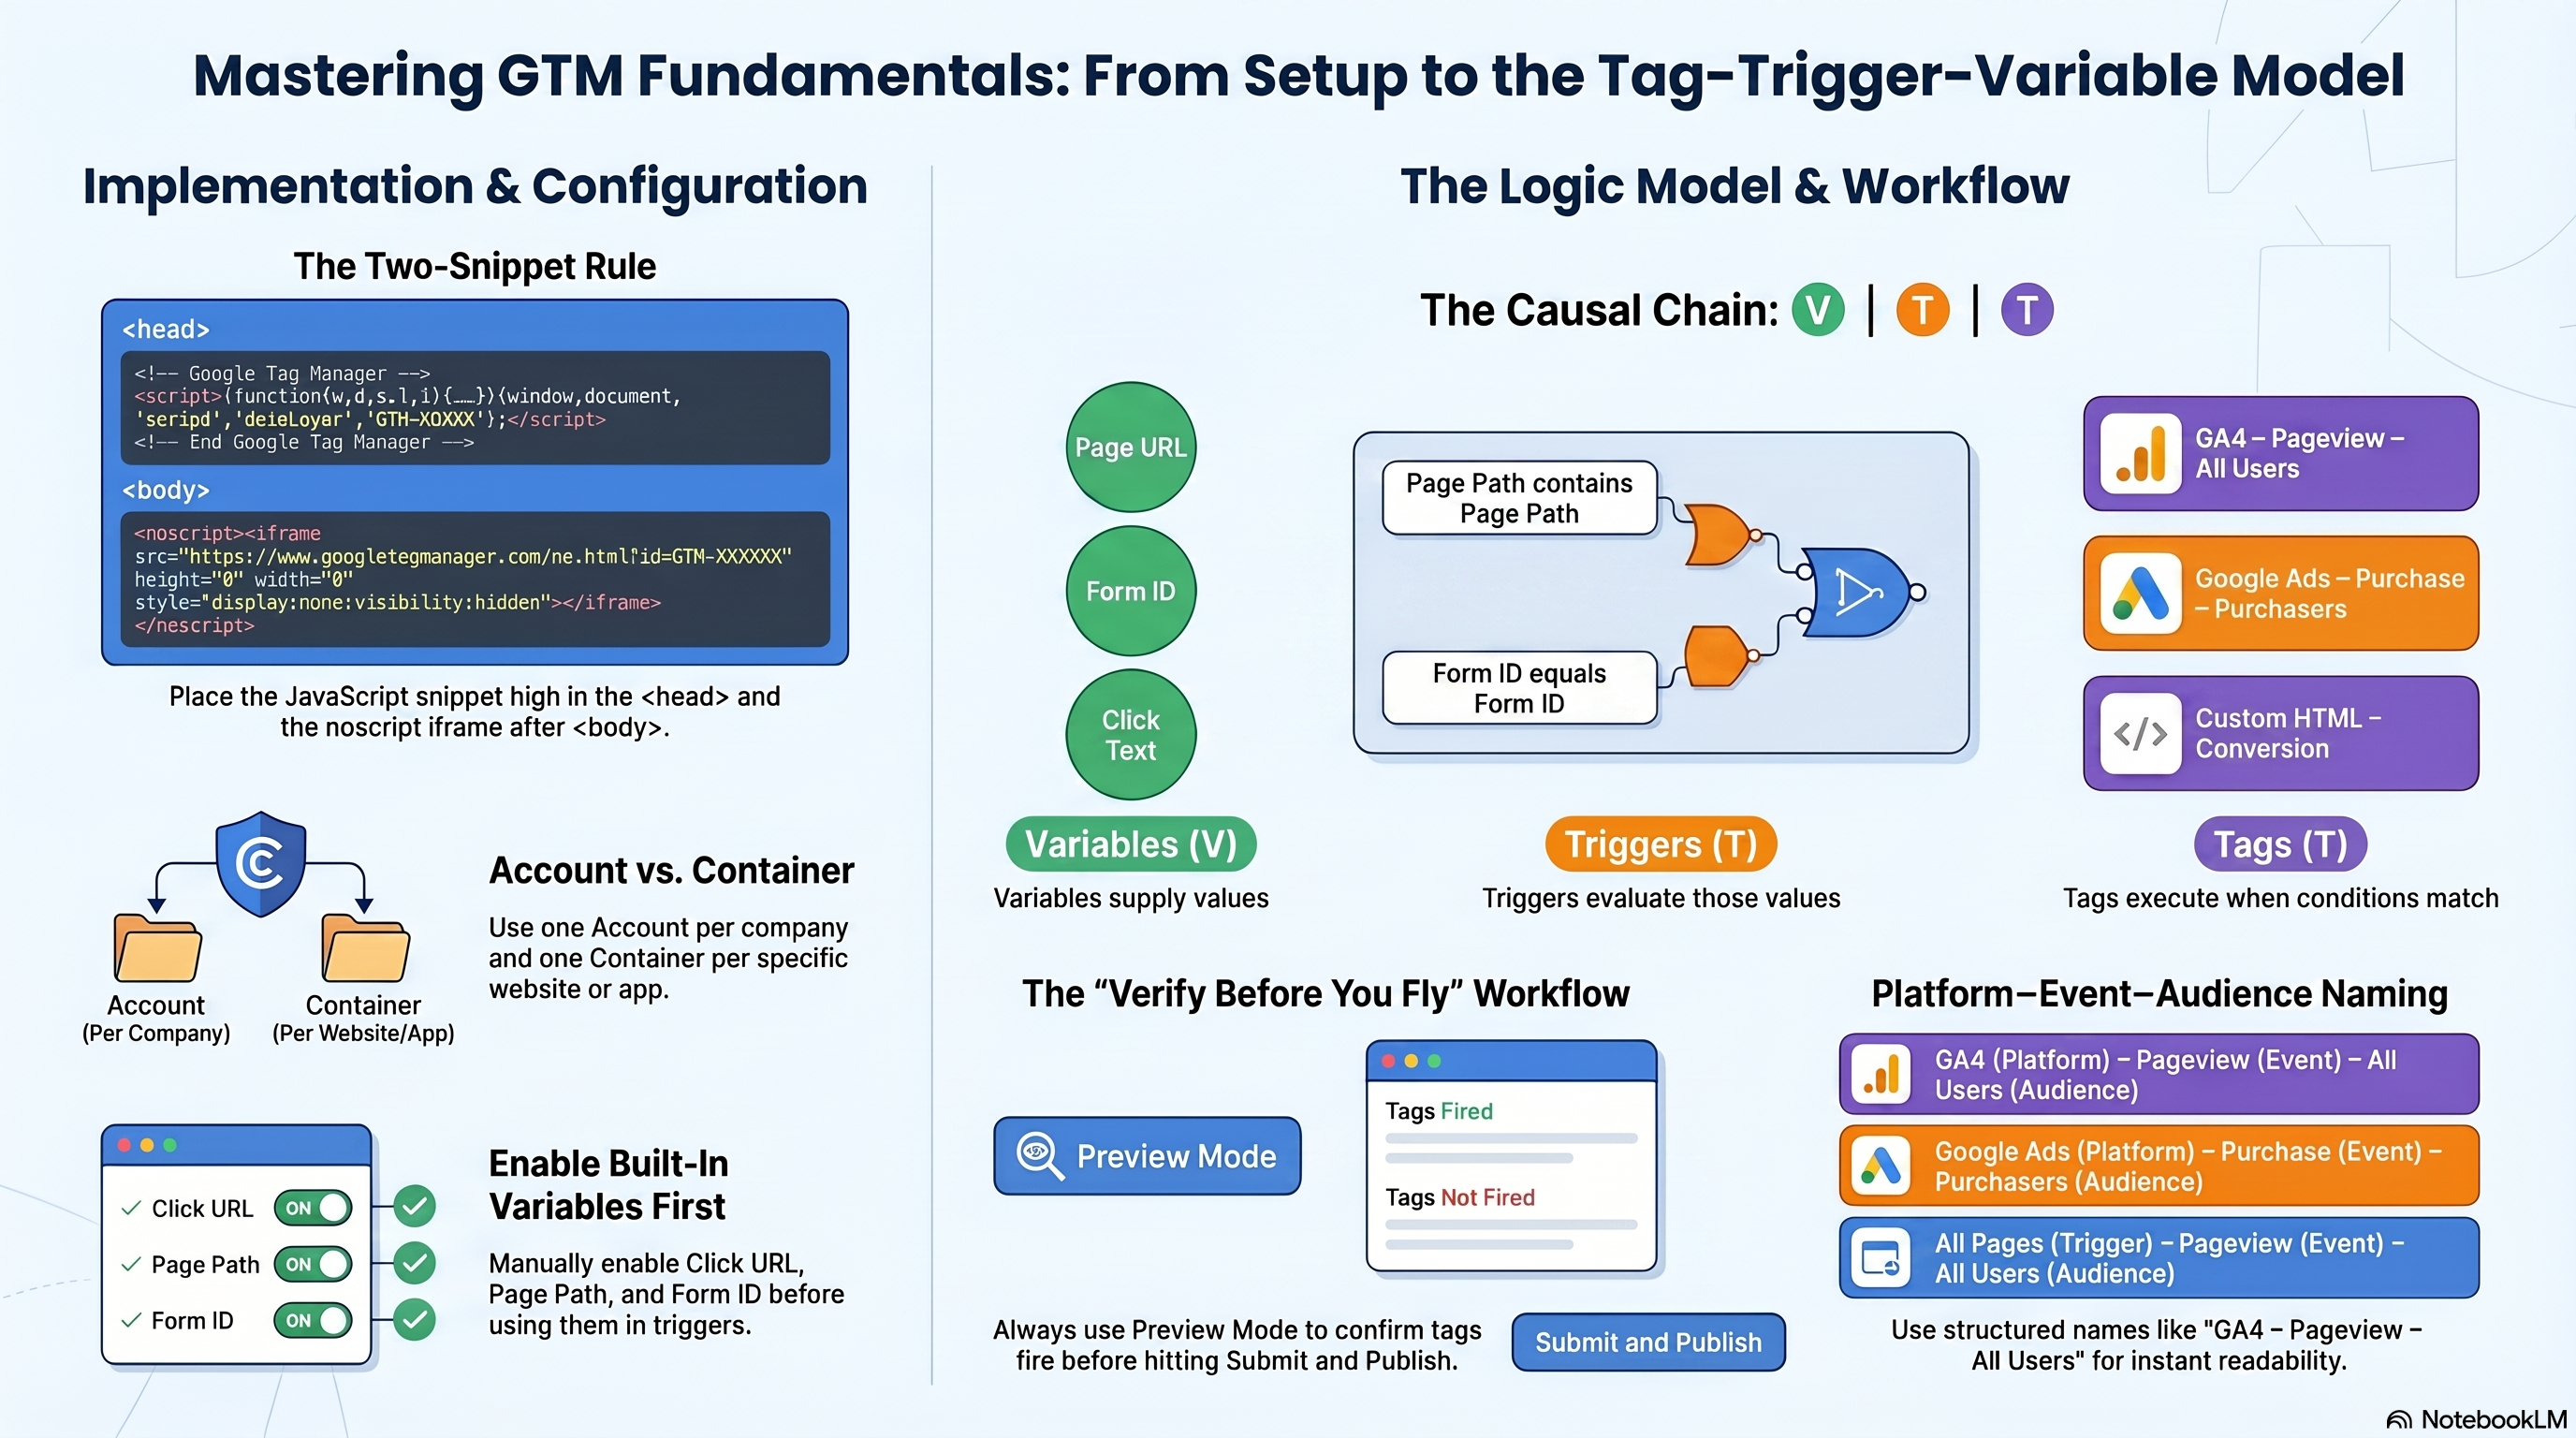
Google Tag Manager lets you deploy and update tracking code without editing website source files. Once the two-snippet container is installed, every tag change — GA4 events, Google Ads conversions, Meta Pixel, third-party scripts — happens entirely inside the GTM UI. The dev team ships once; you iterate continuously.
A container is the deployment unit: a named collection of tags, triggers, variables, and configurations installed on a single website or app. One container ID per property; one account per company. Introduction to Tag Manager
Account and Container: Where Setup Begins
Go to tagmanager.google.com, click Accounts → Create Account. Name the account after the company (one account per organization). Under Container Setup, name the container after the website URL (e.g., www.example.com) and set Target Platform to Web. Accept the Terms of Service.
GTM generates a container ID in the format GTM-XXXXXXX — it must appear in both code snippets. The account is an organizational layer only; all tag work happens at the container level. Create an account and container
Installing the Two-Snippet Bundle
GTM requires exactly two code snippets present on every page. Placement is mandatory, not advisory:
- JavaScript snippet — paste as high in
<head>as possible, before CSS and any other scripts. - noscript iframe — paste immediately after the opening
<body>tag.
```html <!-- Inside <head> — as high as possible --> <script>(function(w,d,s,l,i){...})(window,document,'script','dataLayer','GTM-XXXXXXX');</script>
<!-- Immediately after opening <body> tag --> <noscript><iframe src="https://www.googletagmanager.com/ns.html?id=GTM-XXXXXXX" height="0" width="0" style="display:none;visibility:hidden"></iframe></noscript> ```
Reversed placement — noscript in the <head> or the JavaScript at the bottom of <body> — causes timing failures that break click and form triggers. The noscript fallback is not optional; skipping it drops all tracking for users with JavaScript disabled. Install a web container
<Callout type="warning"> One container per website. Installing one shared container across multiple unrelated domains makes site-specific deployments impossible without affecting all other properties. Create a separate container for each website or app. </Callout>
The Tag-Trigger-Variable Model
Every container operates on a three-component causal chain:
- Variables supply values — page URL, clicked element href, form ID. They answer: what data is available right now?
- Triggers evaluate those values against filter conditions and signal a tag to fire. They answer: does this interaction meet the criteria?
- Tags execute when their trigger fires, sending data to external systems (GA4, Google Ads, Meta Pixel). They answer: what action should run?
The chain runs in one direction: Variables → Triggers → Tags. A tag with no trigger will never fire. A trigger with no filter conditions fires on event type alone — the built-in All Pages trigger is exactly this: Pageview type, no conditions, fires on every page load. About triggers
Worked example: track outbound link clicks. The Click URL variable captures the destination href. A Click – Just Links trigger filters for "Click URL does not contain yourdomain.com." A GA4 Event tag fires on the match and sends outbound_click to GA4. Swap any one component and behavior changes; the other two stay untouched.
Built-In Variables: Enable Before You Use
GTM ships with 40+ pre-configured built-in variables across 9 categories — all disabled by default. To activate one: Variables → Configure, check the variable, click Close. Enable these three before the exercise below: Click URL (Clicks group), Page Path (Pages group), Form ID (Forms group).
What they return:
- Page Path — URL path only (e.g.,
/blog/post-1), no domain or query string. Available on any page-based trigger. - Click URL — href of the clicked element; dataLayer key
gtm.elementUrl. Click triggers only. - Form ID —
idattribute on the submitted form; dataLayer keygtm.elementId. Form triggers only.
Built-in variables for web containers
Your First Tag: All-Pages Pageview
Create the simplest useful tag to verify your container works end-to-end:
- Tags → New → Tag Configuration → Google Tag.
- Enter your Measurement ID (e.g.,
G-XXXXXXXXXX). Name the tag "GA4 – Pageview – All Users" (explained in the next section). - Click Triggering and select the built-in All Pages trigger.
- Save.
This tag fires on every page load with no conditions. It confirms the container is installed and communicating. GA4 Configuration tag deployment, DebugView validation, and custom event setup are in 02-ga4-integration-custom-events.
GTM Preview Mode and Tag Assistant
Never publish without verifying. Click Preview, enter your site URL in Tag Assistant, click Connect. Your site opens with "Connected" in the corner. Interact with the page, then select any event in Tag Assistant's left panel — your tag should appear under Tags Fired. Preview and debug containers
Tags Not Fired means the trigger condition didn't match. Check: trigger assigned? Built-in variables enabled?
Tag Assistant is also a Chrome extension. Its Troubleshoot button opens the same debug view against any page already running your container — no need to re-enter Preview Mode each time. Tag Assistant
Correct publish sequence: Save → Preview → Verify Tags Fired → Submit → Publish. A misfiring trigger produces zero data with no error message.
The Platform-Event-Audience Naming Convention
A container with free-form names — "GA4 tag", "my trigger", "click var 2" — becomes unauditable within weeks. Apply one consistent three-part pattern to every tag, trigger, and variable:
Platform – Event – Audience
Examples: "GA4 – Pageview – All Users" (tag), "Google Ads – Purchase – Purchasers" (tag), "All Pages – Pageview – All Users" (trigger), "Click URL – All Links" (variable).
Platform = the vendor (GA4, Google Ads, Meta). Event = the interaction (Pageview, Purchase). Audience = the scope (All Users, Purchasers). Reading "Google Ads – Purchase – Purchasers" immediately tells you the platform, event, and who is tracked — no configuration panel needed. GTM naming convention guide
Hands-On Exercise: Wire Your First Container
Start with a blank HTML staging page at a local or test domain.
- Create a GTM account and Web container. Copy the container ID.
- Paste the JavaScript snippet as the first element inside
<head>. Paste the noscript iframe immediately after<body>. - Under Variables → Configure, enable Click URL, Page Path, and Form ID.
- Create a tag: type Google Tag, Measurement ID
G-XXXXXXXXXX, trigger All Pages, name "GA4 – Pageview – All Users". - Click Preview, connect to your staging page.
Success criteria:
- Tag Assistant shows "Connected" on the staging page.
- "GA4 – Pageview – All Users" appears under Tags Fired on the Window Loaded event.
- The Variables tab shows Page Path populated with the current path (e.g., /).
Once all three pass, the container foundation is solid. Next: 02-ga4-integration-custom-events covers the GA4 Configuration tag, form and scroll event tracking, and cross-validating events in GA4 DebugView before publish.
GA4 Integration via GTM: Configuration Tag and Custom Event Tracking
Setting Up the Google Tag
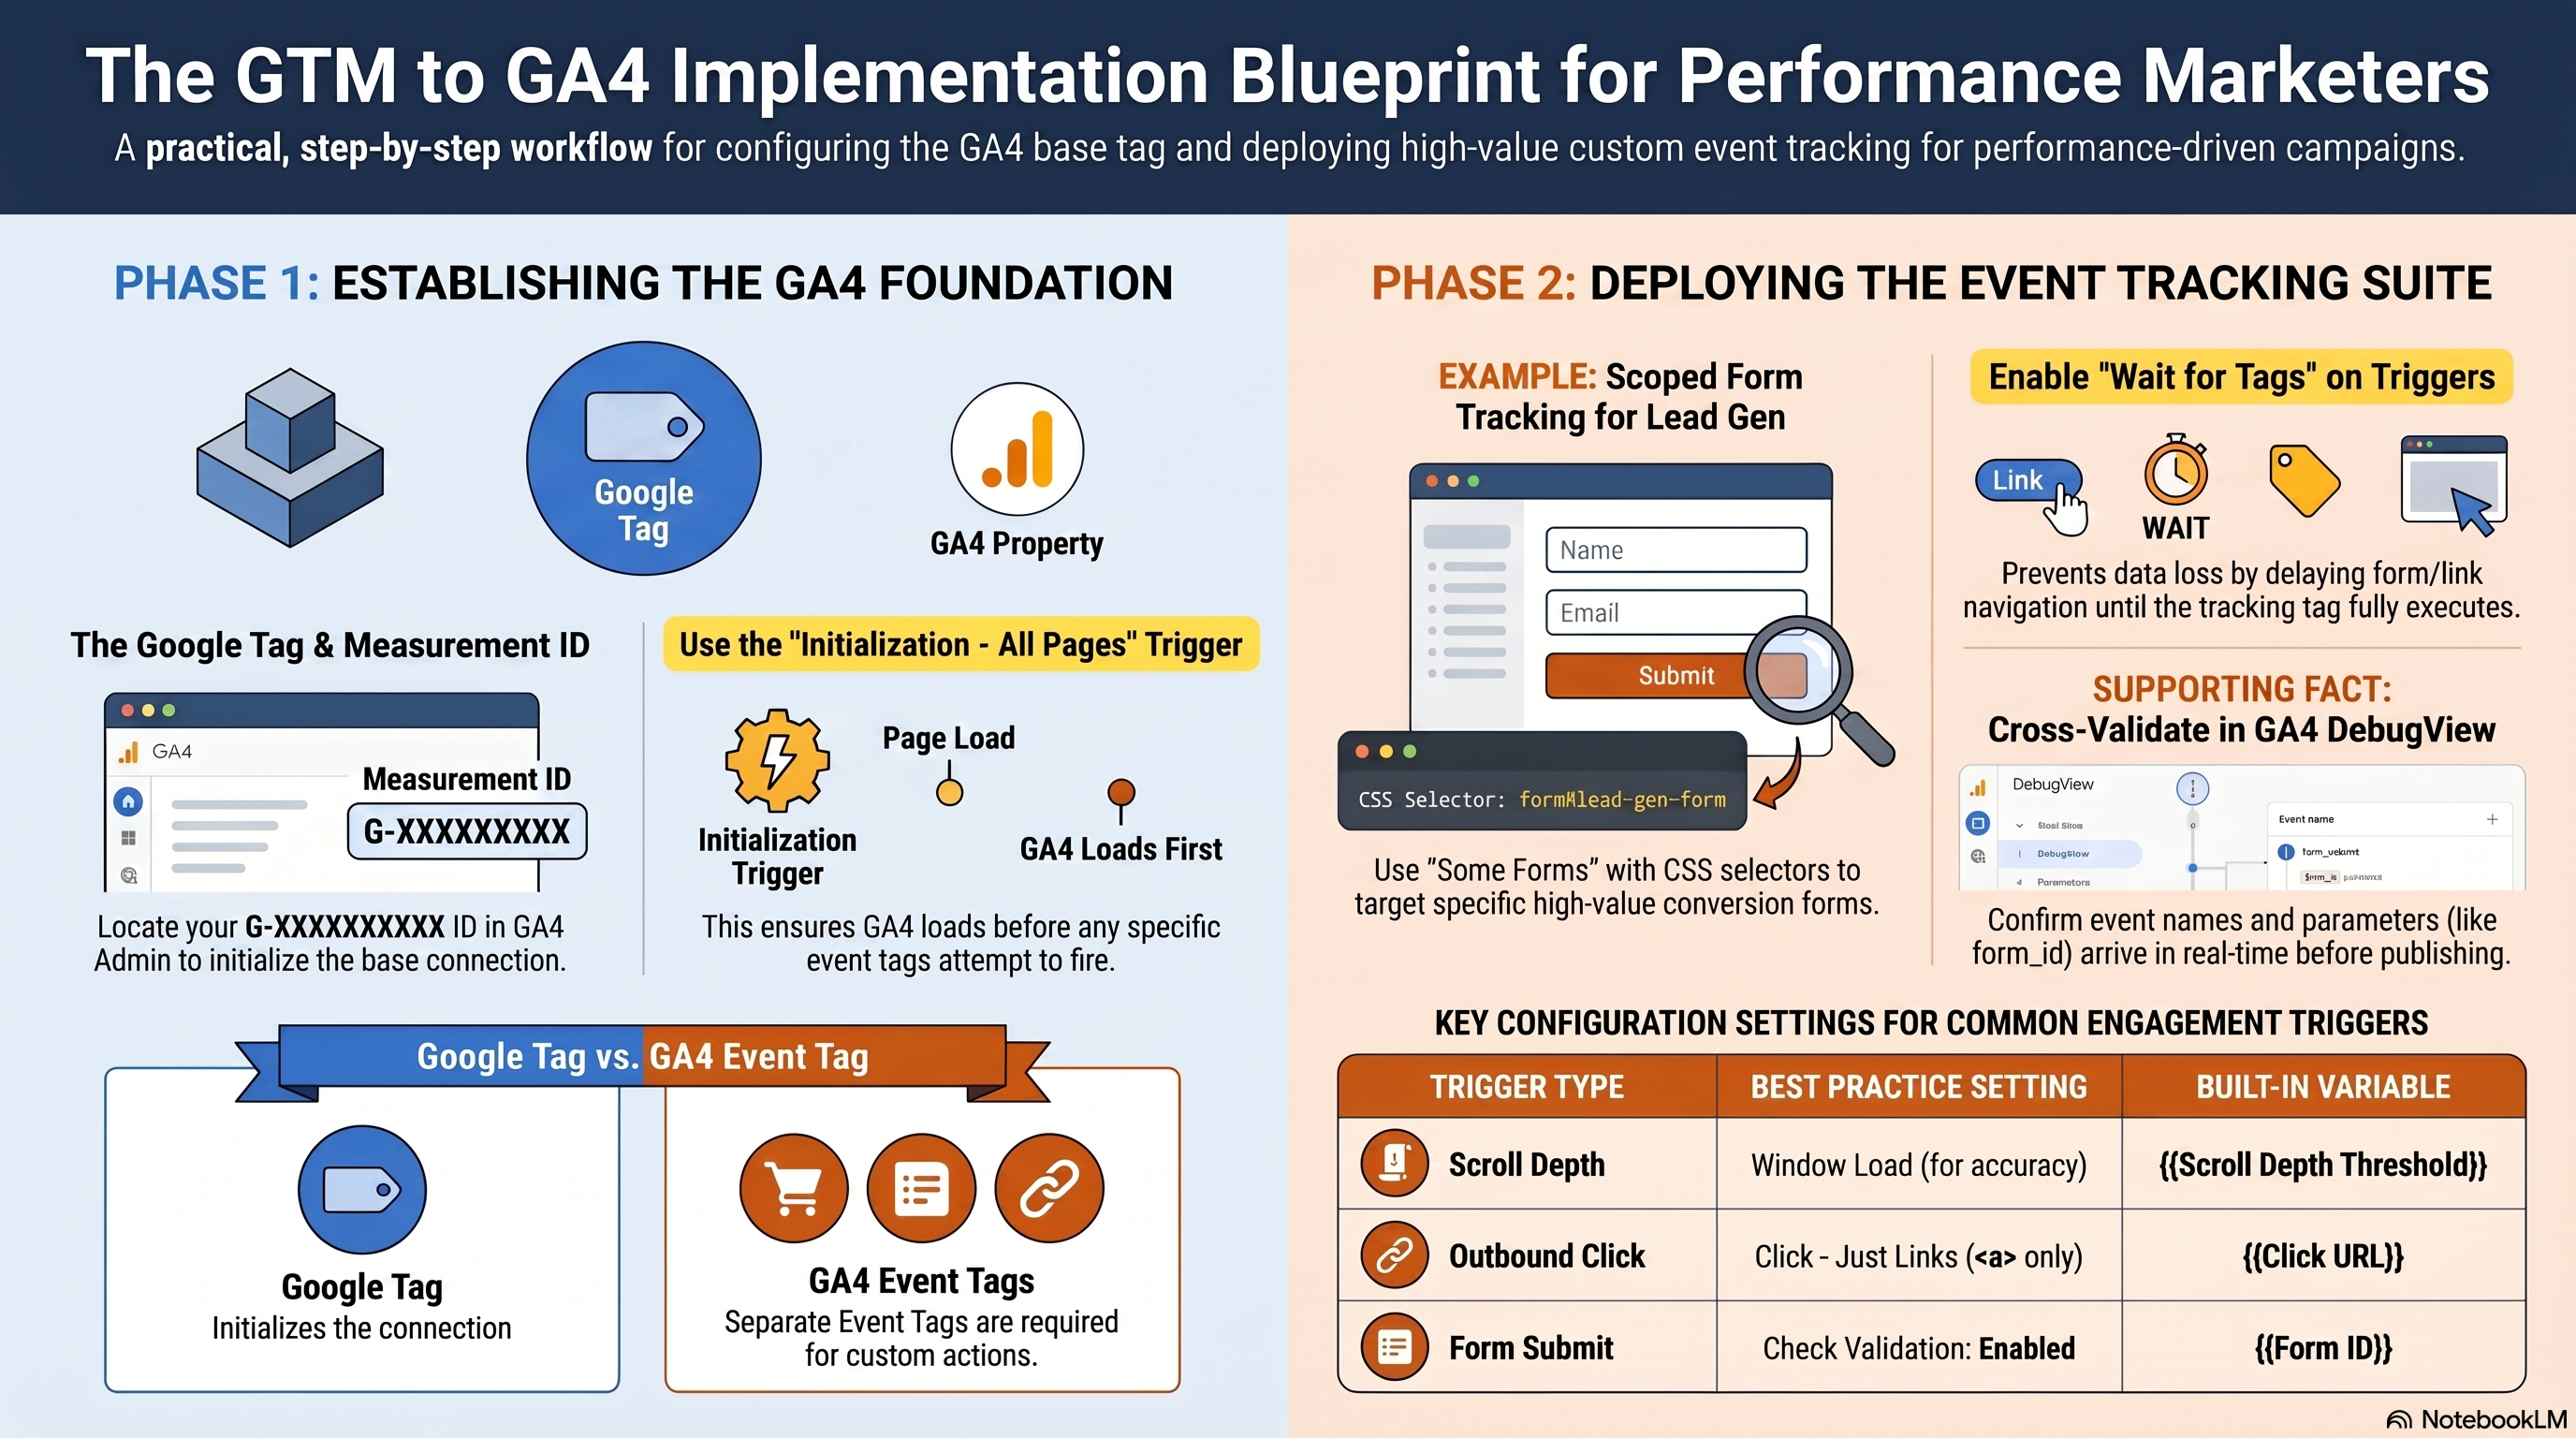
GA4 needs the Google tag — formerly called the "GA4 Configuration tag," renamed by Google in 2023 but functionally identical — to initialize on every page before any custom event can land. Your chapter 1 container is already live; this chapter layers the GA4 connection and four event types on top of it.
Get your Measurement ID first. In GA4, go to Admin → Data collection and modification → Data streams → click your web stream name → find the ID under Stream details. It looks like G-PSW1MY7HB4. This string is also called the Google tag ID and the destination ID — all three names refer to the same value. Editor-level permission on the GA4 property is required to view it. Copy it from GA4, not from Google Ads; Ads IDs begin with AW-, not G-, and entering the wrong prefix means your tag silently sends data nowhere.
Create the Google tag in GTM: Tags → New → name it GA4 – Google tag – All Pages. Tag type: Google Tag. In the Tag ID field, paste your Measurement ID. Triggering: Initialization – All Pages. The Initialization trigger fires earlier in the page lifecycle than Page View, giving GA4 time to initialize before any subsequent Event tags attempt to send data. Save, enter Preview mode, reload the page, and confirm the tag appears under Tags Fired.
Form Submission Event with CSS Selector Scoping
The Google tag handles page_view automatically. Every other event needs its own GA4 Event tag with an appropriate trigger.
For form tracking, scope is the critical design decision. Nearly every site has multiple forms — search bars, login fields, newsletter signups, and checkout — and you rarely want all of them mapped to the same GA4 event. The Form Submission trigger's Some Forms option lets you restrict firing to a single form via a CSS selector condition, as documented in the Form submission trigger reference.
Create the trigger: Triggers → New → Form Submission. Under This trigger fires on, select Some Forms. Add condition: CSS Selector → matches CSS selector → .newsletter-form (replace with your target form's class or ID). Enable Wait for Tags — this holds the browser's default form action until your tags have fired, preventing data loss when a form redirects the page before the tag completes. Enable Check Validation so the trigger only fires on successfully validated submissions. Name it Form Submit – Newsletter.
Create the GA4 Event tag: Tags → New → Google Analytics: GA4 Event. Measurement ID: your G-XXXXXXXXXX. Event Name: generate_lead (a GA4 recommended event name that appears in standard reports). Add parameter: form_id = {{Form ID}}. Triggering: Form Submit – Newsletter.
Scroll-Depth and Outbound-Click Events
Scroll Depth uses GTM's built-in Scroll Depth trigger. Create the trigger: Triggers → New → Scroll Depth. Enable Vertical Scrolls, enter thresholds 25,50,75,100 as Percentages. Leave listener timing at the default Window Load — this ensures the browser has finished rendering all content before percentage thresholds are calculated, so "25%" is consistent across long and short pages. The trigger fires once per threshold per page load; scrolling back toward the top never re-fires a threshold that has already fired. Three built-in variables populate automatically: Scroll Depth Threshold, Scroll Depth Units, and Scroll Direction.
Create the event tag: GA4 Event → Event Name scroll → parameter percent_scrolled = {{Scroll Depth Threshold}}.
Outbound click uses the Click – Just Links trigger, which fires exclusively on <a> anchor elements and ignores buttons, divs, and images. Ensure the Click URL built-in variable is enabled (covered in 01-gtm-fundamentals-container-setup). Then create the trigger: Triggers → New → Click – Just Links → Some Link Clicks → Click URL → does not contain → yourdomain.com. Enable Wait for Tags.
Create the event tag: Event Name click, parameters link_url = {{Click URL}} and outbound = true.
<Callout type="warning">
Scroll Depth listener timing matters. If you change the default from Window Load to Container Load, GTM calculates percentage thresholds before the page finishes rendering. The measured scrollHeight may be shorter than the fully loaded page, causing the 75% threshold to fire at what is actually 50% of the content. Leave the default Window Load unless you have a specific technical reason to change it.
</Callout>
Validating Events in GA4 DebugView
GTM Preview confirms a tag fires on the client side. GA4 DebugView confirms the data actually arrives in your GA4 property — with the correct event name and parameter values. Both checks are required before publishing.
When GTM Preview launches, Tag Assistant automatically appends a _dbg parameter to the site URL, which enables DebugView for your session. No separate debug_mode: true tag parameter is needed. Open GA4: Admin → Data display → DebugView.
DebugView provides two time windows: Seconds stream (last 60 seconds) and Minutes stream (per-minute counts over 30 minutes); see the GA4 DebugView documentation. Click any event name to expand its parameter list. For each event you configured, confirm: the event name matches exactly what you set in the GA4 Event tag; expected parameters appear with correct values (form_id, percent_scrolled, link_url); and no unexpected duplicate events appear. A generate_lead that fires twice per form submission points to a trigger scoping problem — fix it before you publish.
DebugView data is a diagnostic overlay; it is not included in standard GA4 reports and does not affect production metrics.
Publishing the Container Version
Preview mode tests your workspace draft. Real users see none of these events until you publish. Once DebugView confirms all four events are landing correctly, click Submit → Publish and Create Version. Name the version descriptively — for example, v2 – GA4 base tag + form, scroll, outbound events. Click Publish.
The version goes live immediately and creates a permanent, timestamped snapshot in GTM version history — your rollback point if a future change breaks something. Publishing requires Approve access or above on the GTM container. Analysts and editors below that threshold can save workspace changes but cannot push them live.
Hands-On Exercise: GA4 Event Suite
Using a real or sandbox GTM container connected to a GA4 property, build and validate the complete event suite:
- Create the Google tag with your GA4 Measurement ID on the Initialization – All Pages trigger. In GTM Preview, confirm it fires. In GA4 DebugView, confirm
page_viewappears within five seconds withpage_locationandpage_titleparameters. - Identify a form on your site. Create a Form Submission trigger scoped to that form's CSS selector with Wait for Tags and Check Validation enabled. Create a GA4 Event tag named
generate_leadwith aform_idparameter. Submit the form in Preview mode and confirm the event in DebugView. - Create a Scroll Depth trigger for
25,50,75,100percent at Window Load. Wire it to a GA4 Event tag namedscrollwithpercent_scrolledas a parameter. Scroll through a long page in Preview mode and confirm four separatescrollevents in DebugView with the correct threshold values. - Create a Click – Just Links trigger for outbound links. Create a GA4 Event tag named
clickwithlink_urlandoutboundparameters. Click an external link in Preview mode and confirm in DebugView. - Publish the container. Name the version to reflect its contents.
Success criteria: All four events visible in GA4 DebugView with correct parameter values before publish. Container version published with a descriptive name that includes the event types added.
Chapter 3 covers how the dataLayer passes purchase data from your site to GTM — and how the Google Ads Conversion Tracking tag reads it to carry revenue values into Smart Bidding. See 03-google-ads-conversion-datalayer.
Conversion Tracking: Google Ads Tags and the dataLayer
How the dataLayer Bridges Your Page and GTM
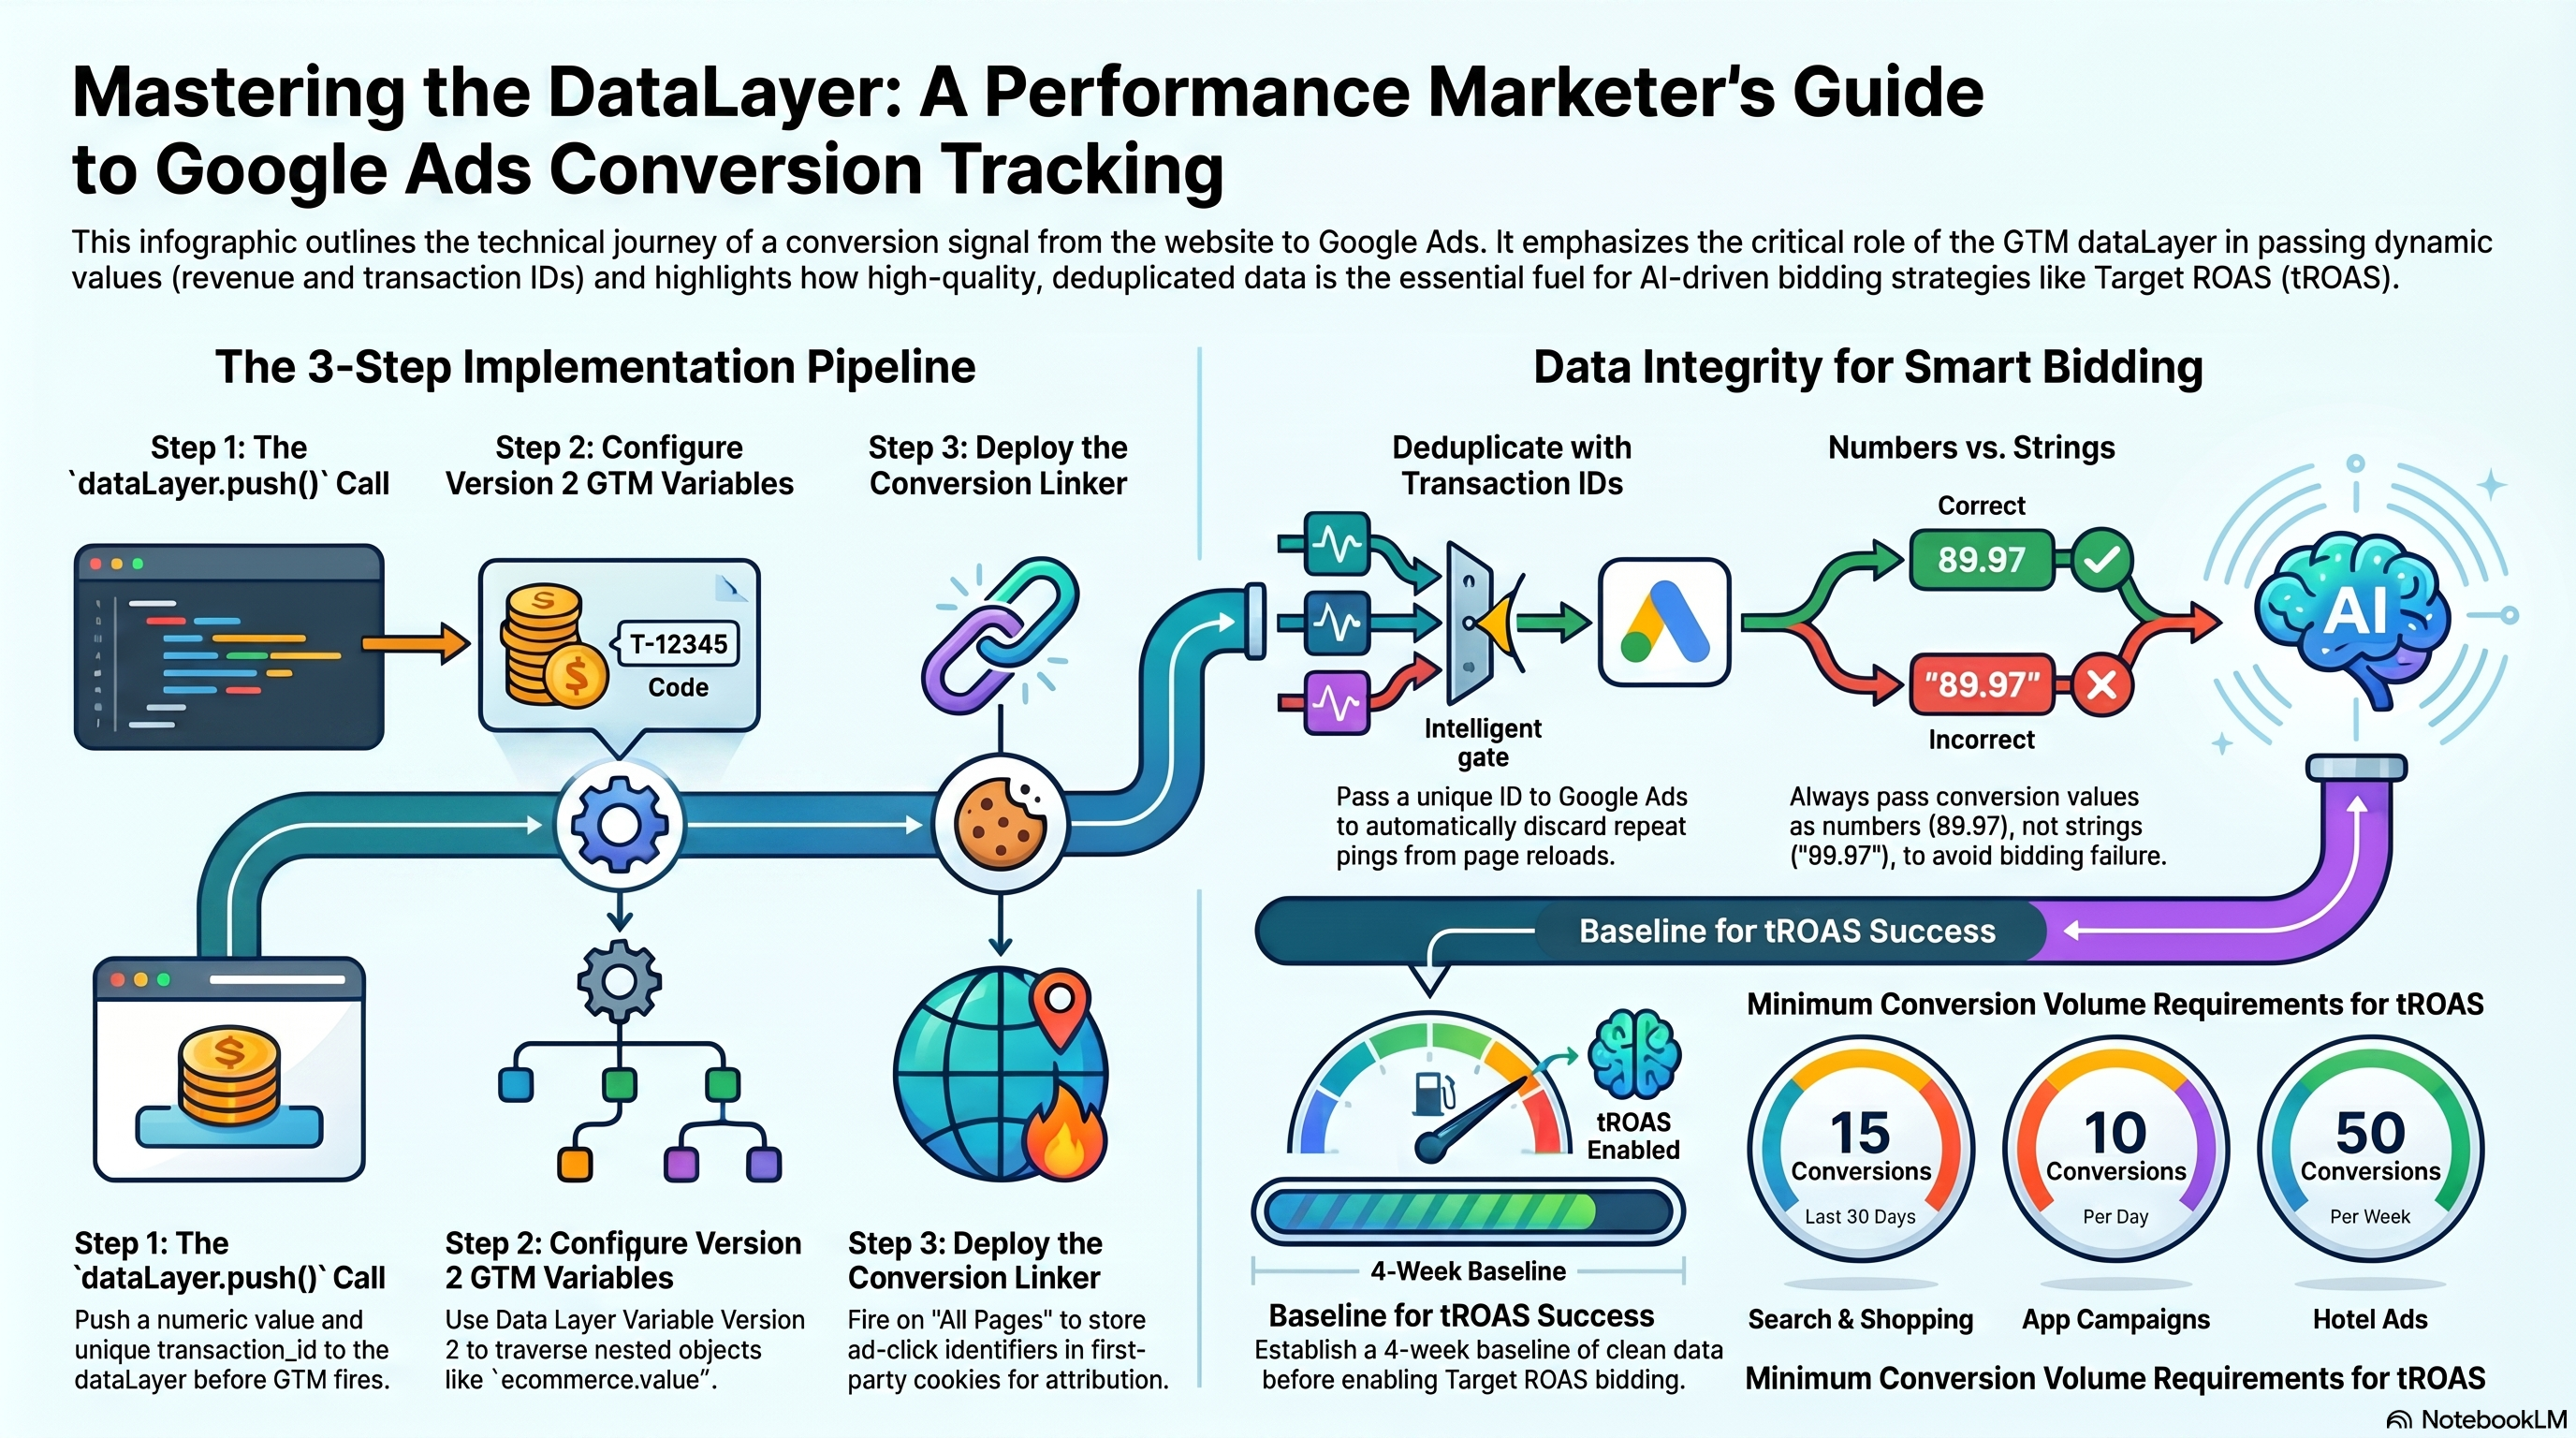
The dataLayer is a JavaScript array — window.dataLayer — that acts as a communication bus between your page code and Google Tag Manager. Your site writes to it; GTM reads from it.
The write mechanism is dataLayer.push(). You call it with a plain JavaScript object containing an event key and whatever variable data you want GTM to consume. The event key is special: per The data layer | Google for Developers, GTM evaluates all triggers against it immediately in FIFO order — all matching tags fire before the next push is processed.
On your order-confirmation page, the correct push looks like this:
window.dataLayer = window.dataLayer || [];
dataLayer.push({
  event: 'purchase',
  ecommerce: {
    transaction_id: 'ORD-20260610-00042',  // server-rendered, unique per order
    value: 89.97,                           // number — not a string
    currency: 'USD',                        // ISO 4217
    tax: 7.20,
    shipping: 5.99
  }
});
Two details carry real consequences. First, value must be a numeric type — not the string "89.97". Google Ads silently rejects or zeros string values, poisoning tROAS signal. Second, transaction_id must come from server-rendered order data, never a placeholder. A hardcoded ID causes every subsequent purchase to be deduplicated against the first order ever recorded — catastrophic under-reporting that is invisible until you audit your conversion history.
Reading dataLayer Values: the Data Layer Variable Type
To use ecommerce.transaction_id inside a GTM tag you need a Data Layer Variable. Navigate to Variables → New → Variable Configuration → Data Layer Variable.
Set the Data Layer Variable Name to the dot-notation key path. For Version 2 containers — the default for all new GTM containers — dots mean nested-object traversal:
| GTM variable name | Data Layer Variable Name | What it reads |
|---|---|---|
| DLV - Transaction ID | ecommerce.transaction_id | The nested transaction ID string |
| DLV - Order Value | ecommerce.value | The numeric revenue amount |
| DLV - Currency | ecommerce.currency | The ISO 4217 currency code |
Per User-defined variable types for web, Version 1 containers treat dots as literal key characters — ecommerce.transaction_id in V1 looks for a top-level key named "ecommerce.transaction_id" and returns undefined for nested structures. Confirm your container is Version 2 before building these variables.
Building the Google Ads Conversion Tracking Tag
Once your Data Layer Variables exist, configure the tag: Tags → New → Google Ads Conversion Tracking.
Fill in:
- Conversion ID: your AW-XXXXXXXXX from the Google Ads conversion action setup screen
- Conversion Label: the action-specific label from the same screen
- Conversion Value: {{DLV - Order Value}}
- Currency Code: {{DLV - Currency}}
- Transaction ID: {{DLV - Transaction ID}}
Set the trigger to a Custom Event with Event Name = purchase (exact match). Avoid a Page View trigger on the thank-you URL — URL conditions fire on every reload and can match sessions that never completed a purchase.
<Callout type="warning">
Pass value as a number; pass currency as an ISO 4217 string. Writing value: "89.97" (quoted) causes Google Ads to record zero revenue for the conversion — tROAS has no accurate signal to bid against. Verify in GTM Preview Mode that DLV - Order Value resolves to a number. The Preview panel shows each variable's resolved value alongside the tag fire event.
</Callout>
Installing the Conversion Linker
The Conversion Linker tag persists Google Ads click parameters — gclid, wbraid, gbraid — from landing-page URL parameters into first-party cookies (_gcl_aw for Google Ads clicks). Without it, a conversion tag firing on a downstream page has no click to attribute, and the conversion is lost or misattributed.
Install it in GTM: Tags → New → Conversion Linker, trigger = All Pages.
For cross-domain flows — ad click on shop.example.com, purchase on secure.payments-example.com:
- Landing-page container: check "Enable linking across domains" and list
secure.payments-example.comin Auto Link Domains. GTM appends a_gllinker parameter to outbound links. - Checkout-domain container: install a Conversion Linker with no cross-domain settings — it reads the
_glparameter and writes the_gcl_awcookie.
To test in Preview Mode: append ?gclid=test123 to a landing-page URL, confirm the Conversion Linker fires in the Summary panel, then run document.cookie in the browser console and verify _gcl_aw=GCL.timestamp.test123 is present. Per Conversion linker - Tag Manager Help, this cookie is what the conversion tag reads at attribution time.
Stopping Duplicate Conversions
Thank-you pages can be revisited — users bookmark them, press back after receiving an email, or refresh after a timeout. Without protection, each visit fires the conversion tag again.
The primary defense is the Transaction ID field in the Google Ads Conversion Tracking tag. When Google Ads receives a conversion ping for a transaction ID it has already recorded for that conversion action, the duplicate is silently discarded server-side. Per Use a transaction ID to minimize duplicate conversions, the ID must be unique per transaction, no longer than 64 characters, and must never contain PII.
A complementary trigger-level guard: use a Custom Event trigger (event = purchase) rather than a Page View trigger on the thank-you URL. The purchase dataLayer push executes once per order — the server embeds it in the confirmation page HTML at render time. A page-view trigger fires on every reload regardless of whether a new purchase occurred.
Why Clean Conversions Power tROAS
Target ROAS Smart Bidding predicts the value of every potential conversion at auction time — bidding higher for users likely to generate high revenue, lower for low-value signals. The prediction model trains on the value parameter from every past conversion event your tags have sent.
Three failure modes collapse tROAS performance simultaneously. Missing values leave the model treating a €10 order identically to a €500 order. String-typed values recorded as zero teach the model that certain audiences are worth nothing, distorting every future bid. Duplicate conversions inflate the reported count, telling the model the campaign is performing better than it actually is and causing overspend relative to real revenue.
Per About Target ROAS bidding, the strategy requires 15 conversions with valid revenue values in the past 30 days before it becomes available for Search and Shopping campaigns, and Google recommends 4 weeks of baseline data before activating it. Value-based Bidding Best Practices explicitly warns against mixing zero-value conversions into a value-based goal — it trains the model against itself.
Hands-On Exercise
Goal: Implement a complete purchase conversion tracking setup on a staging e-commerce site and verify each layer end-to-end in GTM Preview Mode.
- On the order-confirmation page, add a
dataLayer.push()call withevent: 'purchase', a numericvalue, an ISO 4217currency, and a uniquetransaction_idsourced from server-rendered order data (not a placeholder). - In GTM, create three Data Layer Variables (Version 2): DLV - Transaction ID (
ecommerce.transaction_id), DLV - Order Value (ecommerce.value), DLV - Currency (ecommerce.currency). - Create a Custom Event trigger: Event Name =
purchase, exact match. - Create a Google Ads Conversion Tracking tag wired to all three variables. Use a real or sandbox Conversion ID and Label from a Google Ads test account.
- Install a Conversion Linker tag on an All Pages trigger.
- Open GTM Preview Mode. Load the confirmation page. Confirm: the Conversion Linker fires, the
purchaseevent appears in the Summary panel, and the Conversion Tracking tag fires with correctly typed values for all three DLV fields. - Reload the page — the tag fires again. That is expected: Google Ads deduplicates via transaction ID server-side, not GTM.
Success criteria: DLV - Order Value resolves to a number, DLV - Transaction ID resolves to a unique non-empty string, DLV - Currency resolves to a valid ISO 4217 code.
Next, you'll deploy audience-building pixels for Google Ads Remarketing and Meta — mapping your dataLayer events to platform-specific standard events for cross-platform audience consistency. 04-remarketing-pixels-meta-multi-platform.md
Remarketing Pixels: Google Ads, Meta, and Multi-Platform Tag Deployment
The Google Ads Remarketing Tag
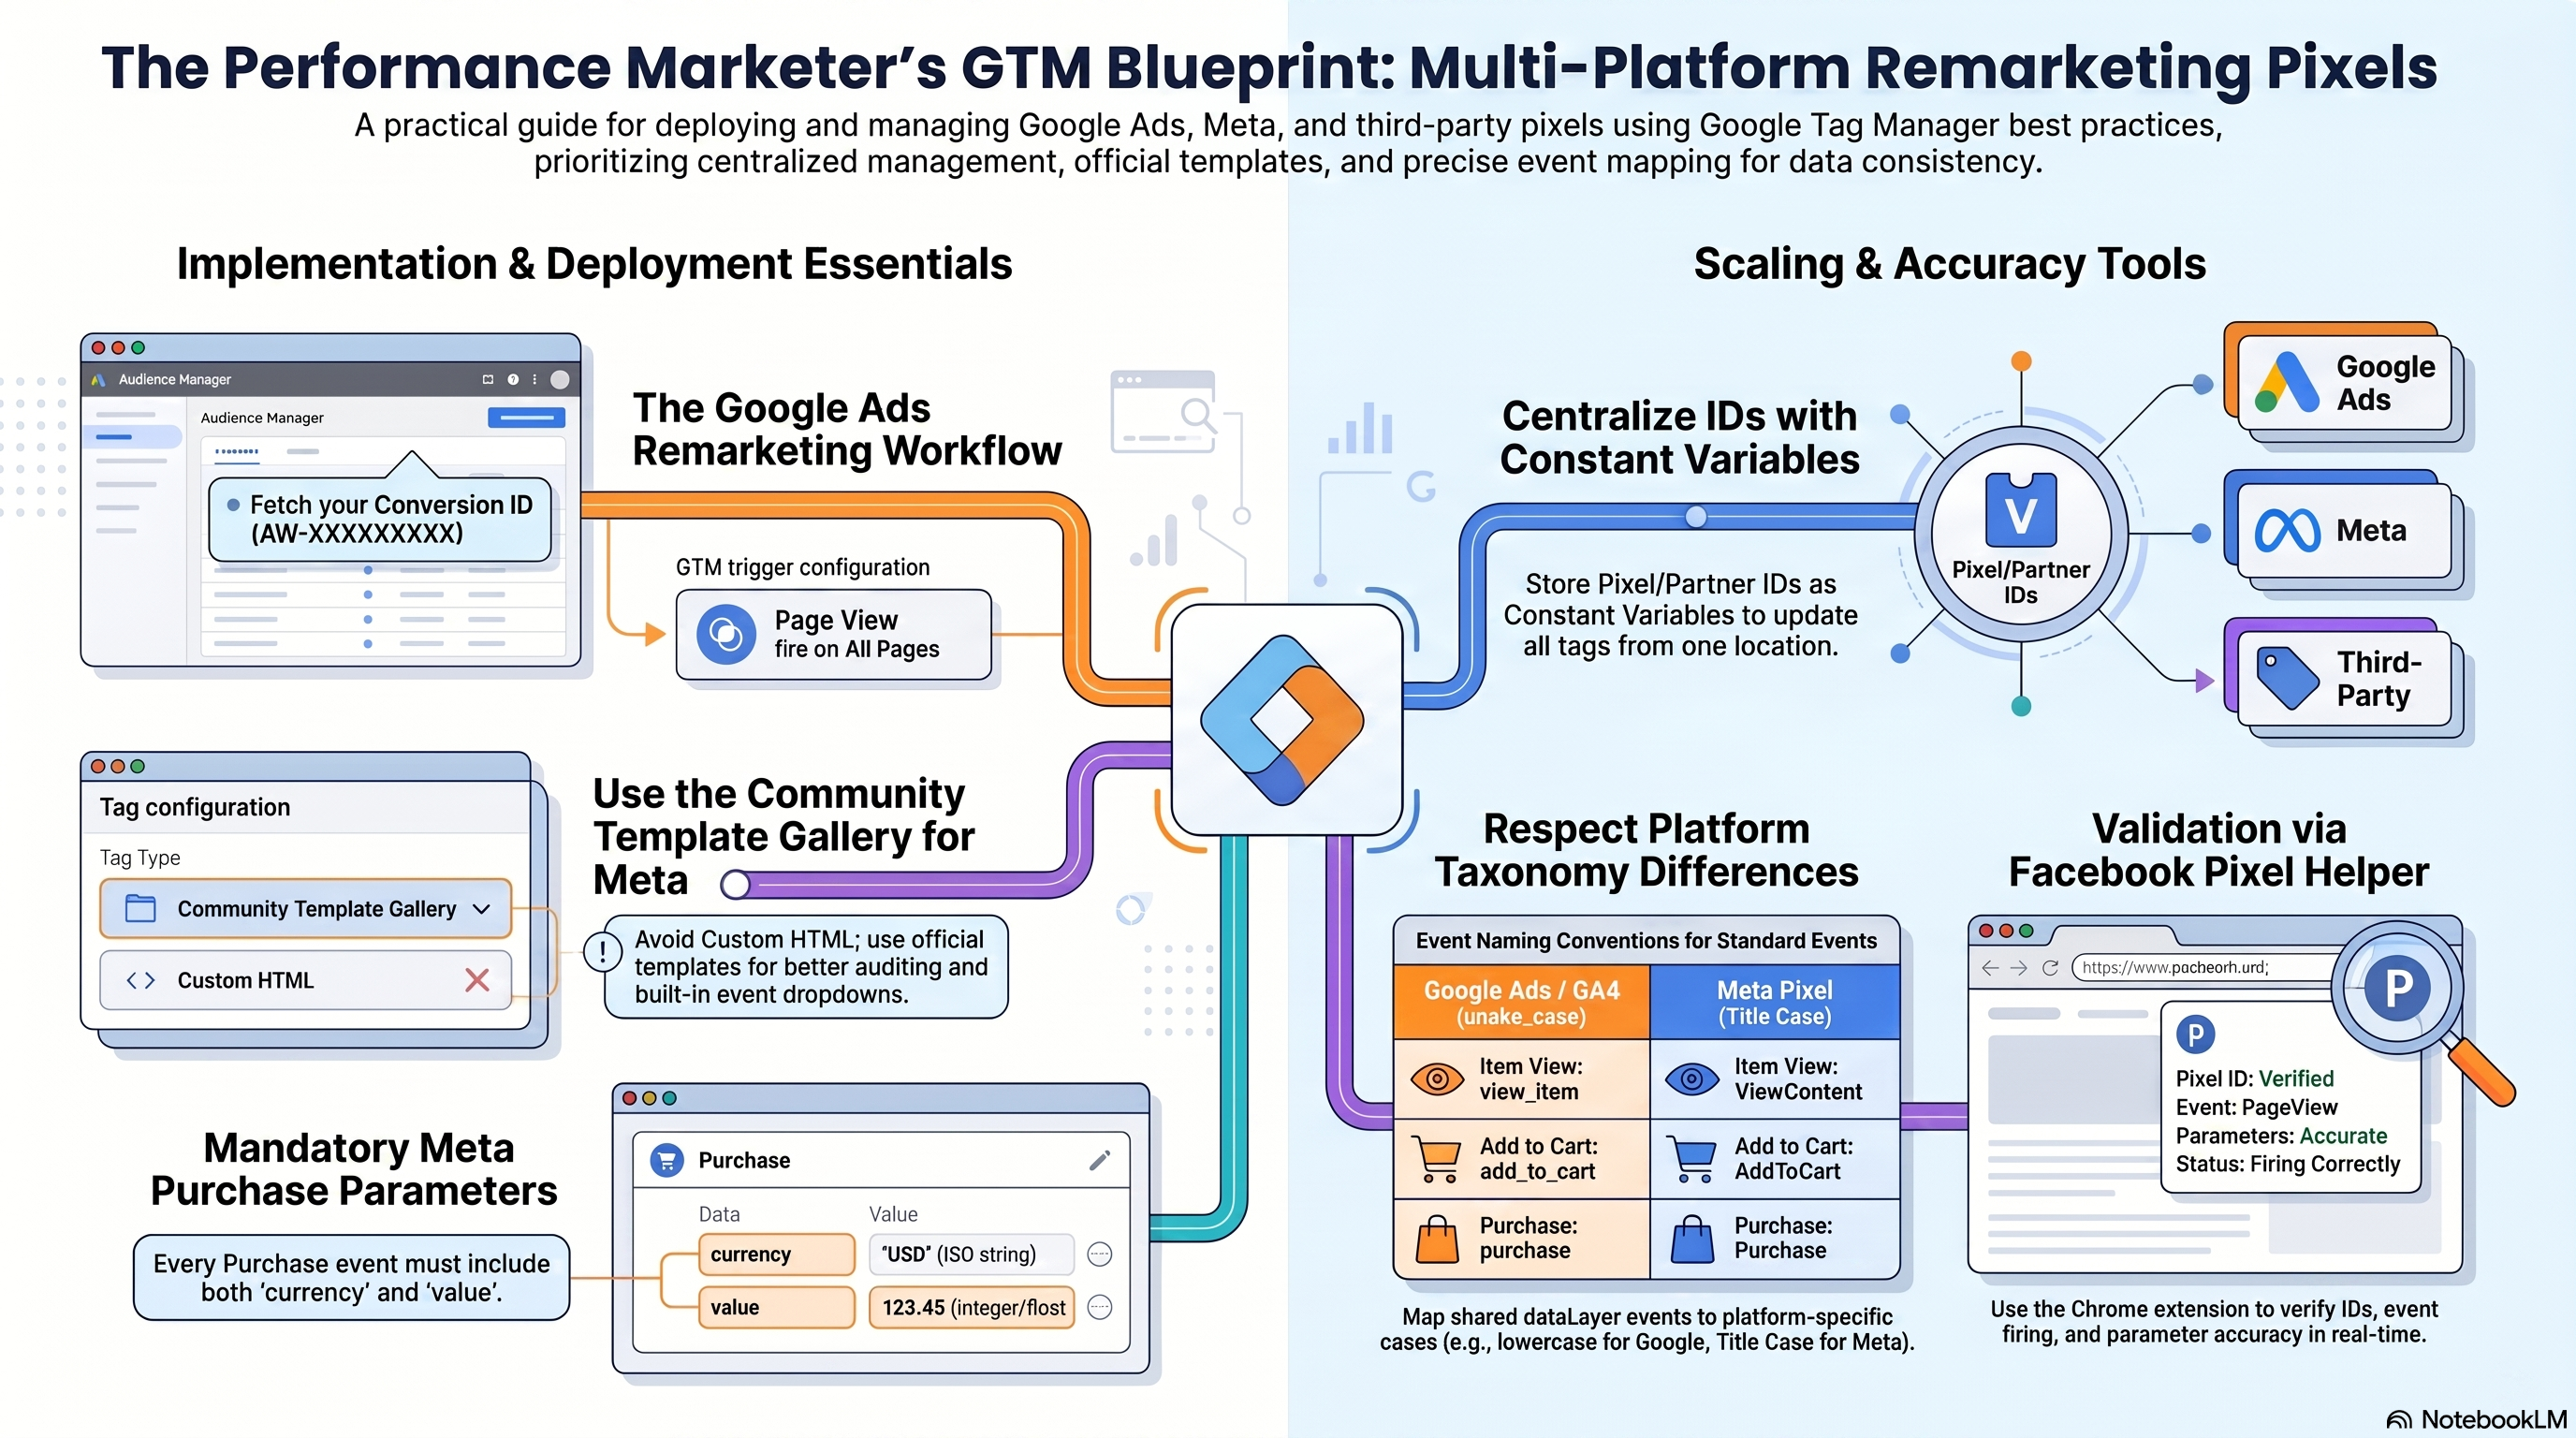
The Google Ads Remarketing tag records every page visit against your Conversion ID, building the audience lists you retarget in display, search, and Performance Max campaigns. It is not the same as the Conversion Tracking tag from chapter 3: that tag records a specific action like a purchase; the Remarketing tag fires broadly to record site membership.
To install: in Google Ads, navigate to Tools > Shared Library > Audience Manager > Audience Sources. On the Google Ads tag card, click Details > Tag Setup > Use Google Tag Manager. Copy the Conversion ID (format: AW-123456789). In GTM, create a Constant Variable named Google Ads Conversion ID with that value (covered in depth next). Create a new tag: Tag Configuration > Google Ads Remarketing, set Conversion ID to {{Google Ads Conversion ID}}, leave Conversion Label blank for a standard all-visitors list, and trigger on All Pages.
Before publishing, confirm a Google base tag (type: Google Tag, Tag ID beginning with GT- or AW-) already fires on All Pages. The Remarketing tag depends on it for cross-browser audience data quality. Standard Google Ads remarketing - Tag Manager Help
<Callout type="warning"> Audience lists have a minimum size threshold before ads can serve. After publishing, allow 24–48 hours, then verify in Audience Manager > Your data segments that the estimated size is non-zero before activating any retargeting campaign. </Callout>
Meta Pixel via the Community Template Gallery
Resist installing Meta Pixel as a Custom HTML tag. GTM's Community Template Gallery hosts an official, maintained Meta Pixel template with a configuration UI, standard event dropdowns, and fields that are straightforward to audit.
To install: Tags > New > Tag Configuration > click "Discover more tag types in the Community Template Gallery" at the bottom of the panel. Search Meta Pixel (or Facebook Pixel), select the official template, and click Add to workspace. In the configuration, set the Pixel ID field to {{Meta Pixel ID}} (a Constant Variable you are about to create), set Event to PageView, trigger on All Pages. Name it Meta Pixel - PageView.
Constant Variables: Single-Point ID Management
Every ad platform assigns you a numeric ID — a Pixel ID for Meta, a Conversion ID for Google Ads, a Partner ID for LinkedIn. Each ID appears across multiple tags. Hard-coding the same string in five tag configuration fields means that when an ID changes after an account restructure or agency handoff, you must find and update every tag. Miss one and it fires silently with the stale value.
The fix is a GTM Constant Variable: Variables > New > Variable Configuration > type Constant. Enter the ID as the value. Name it descriptively: Meta Pixel ID, Google Ads Conversion ID, LinkedIn Partner ID. Reference it as {{Meta Pixel ID}} in every tag. One edit propagates everywhere. User-defined variable types for web - Tag Manager Help
Configuring the Meta Pixel Purchase Event
The Meta Pixel Purchase standard event requires exactly two parameters: currency (an ISO 4217 string, e.g., "USD") and value (an integer or float). Missing either breaks value-based optimization in Meta's delivery algorithm, and Pixel Helper will show a warning that required parameters are absent.
Create a second Meta Pixel tag. Set Event to Purchase. Map the value parameter to a Data Layer Variable reading ecommerce.value — the same key the GA4 purchase event already writes (see ch3). Map currency to a Constant Variable set to "USD", or a Data Layer Variable reading ecommerce.currency for multi-currency stores. Set the trigger to the Custom Event trigger that fires on your purchase dataLayer event. Name it Meta Pixel - Purchase.
Validating with Facebook Pixel Helper
Facebook Pixel Helper is a free official Chrome extension. Install it, load your site, and click the extension icon: it shows every pixel detected, initialization status, which events fired, and any parameter warnings.
To validate the Purchase event, complete a test transaction (or simulate the purchase dataLayer event in GTM Preview Mode). Open Pixel Helper and confirm the correct Pixel ID, a Purchase event, and both currency and value populated. A yellow warning triangle means required parameters are missing — the most common cause is an absent currency field or a mismatched Pixel ID. Meta Pixel Helper - Meta for Developers
A Third Platform: LinkedIn Insight Tag 2.0
The LinkedIn Insight Tag 2.0 follows the exact same installation pattern as Meta Pixel. In LinkedIn Campaign Manager, go to Account Assets > Insight Tag and copy your Partner ID. In GTM, create a Constant Variable LinkedIn Partner ID with the value.
Install the template: Tags > New > Community Template Gallery > search LinkedIn Insight Tag 2.0 > Add to workspace. Set the Partner ID field to {{LinkedIn Partner ID}}, trigger on All Pages, and name the tag LinkedIn - Insight Tag 2.0. After publishing, Campaign Manager's Insight Tag status updates to Active within 24 hours. Add the LinkedIn Insight Tag to GTM - LinkedIn Marketing Solutions Help
Do not fire this tag on pages where users manage financial accounts or medical appointments — LinkedIn's data policy explicitly flags these page types as sensitive.
Cross-Platform Standard Event Mapping
The same user action must be described differently for each ad platform. Google Ads dynamic remarketing and GA4 use lowercase snake_case: purchase, add_to_cart, view_item. Meta Pixel uses title-case: Purchase, AddToCart, ViewContent. These are not interchangeable. Send purchase (lowercase) to Meta and the platform does not recognize it as a standard event — no automatic audience creation, no value-based bidding signal.
When one dataLayer push must trigger multiple platform tags, GTM Custom JavaScript variables bridge the taxonomy gap. Each variable reads the shared GA4-schema payload and returns the platform-correct event name and parameters. The Google Ads Remarketing tag can consume the native GA4 purchase event name, while a Custom JavaScript variable returns "Purchase" for the Meta Pixel tag configuration. Dynamic remarketing events and parameters - Google Ads Help
This is the core value of a GA4-schema dataLayer: one well-structured push feeds every ad platform through per-platform transformation variables, without duplicating data collection logic.
Hands-On Exercise
Goal: Deploy a Google Ads Remarketing tag, a Meta Pixel PageView tag, and a Meta Pixel Purchase event tag in a GTM container using Constant Variables throughout.
- Retrieve your Google Ads Conversion ID from Audience Manager > Audience Sources > Google Ads tag > Tag Setup > Use Google Tag Manager.
- Create a Constant Variable
Google Ads Conversion IDin GTM. - Create a Constant Variable
Meta Pixel IDwith your Pixel ID from Meta Events Manager. - Install the Meta Pixel template from the Community Template Gallery; configure a PageView tag on All Pages.
- Create a Google Ads Remarketing tag referencing
{{Google Ads Conversion ID}}on All Pages. - Create a Meta Pixel Purchase tag with
valuemapped toecommerce.value,currencyto your currency constant, triggered on yourpurchaseCustom Event. - Use GTM Preview Mode to simulate a page view and a purchase, then open Facebook Pixel Helper and verify: PageView fires on load, Purchase fires with correct
valueandcurrency, no warning icons. - After publishing, return to Google Ads Audience Manager in 24–48 hours and confirm the data segment shows Active status.
Success criteria: Pixel Helper shows both events with no parameter warnings; Audience Manager shows the data segment collecting or Active.
Next, you will build a systematic debugging workflow for misfiring tags, undefined variables, and duplicate events, and learn how to apply a pre-publish QA checklist to every container version: 05-debugging-qa-container-governance.
Debugging, QA, and Container Governance
Diagnosing Tag Errors with GTM Preview Mode
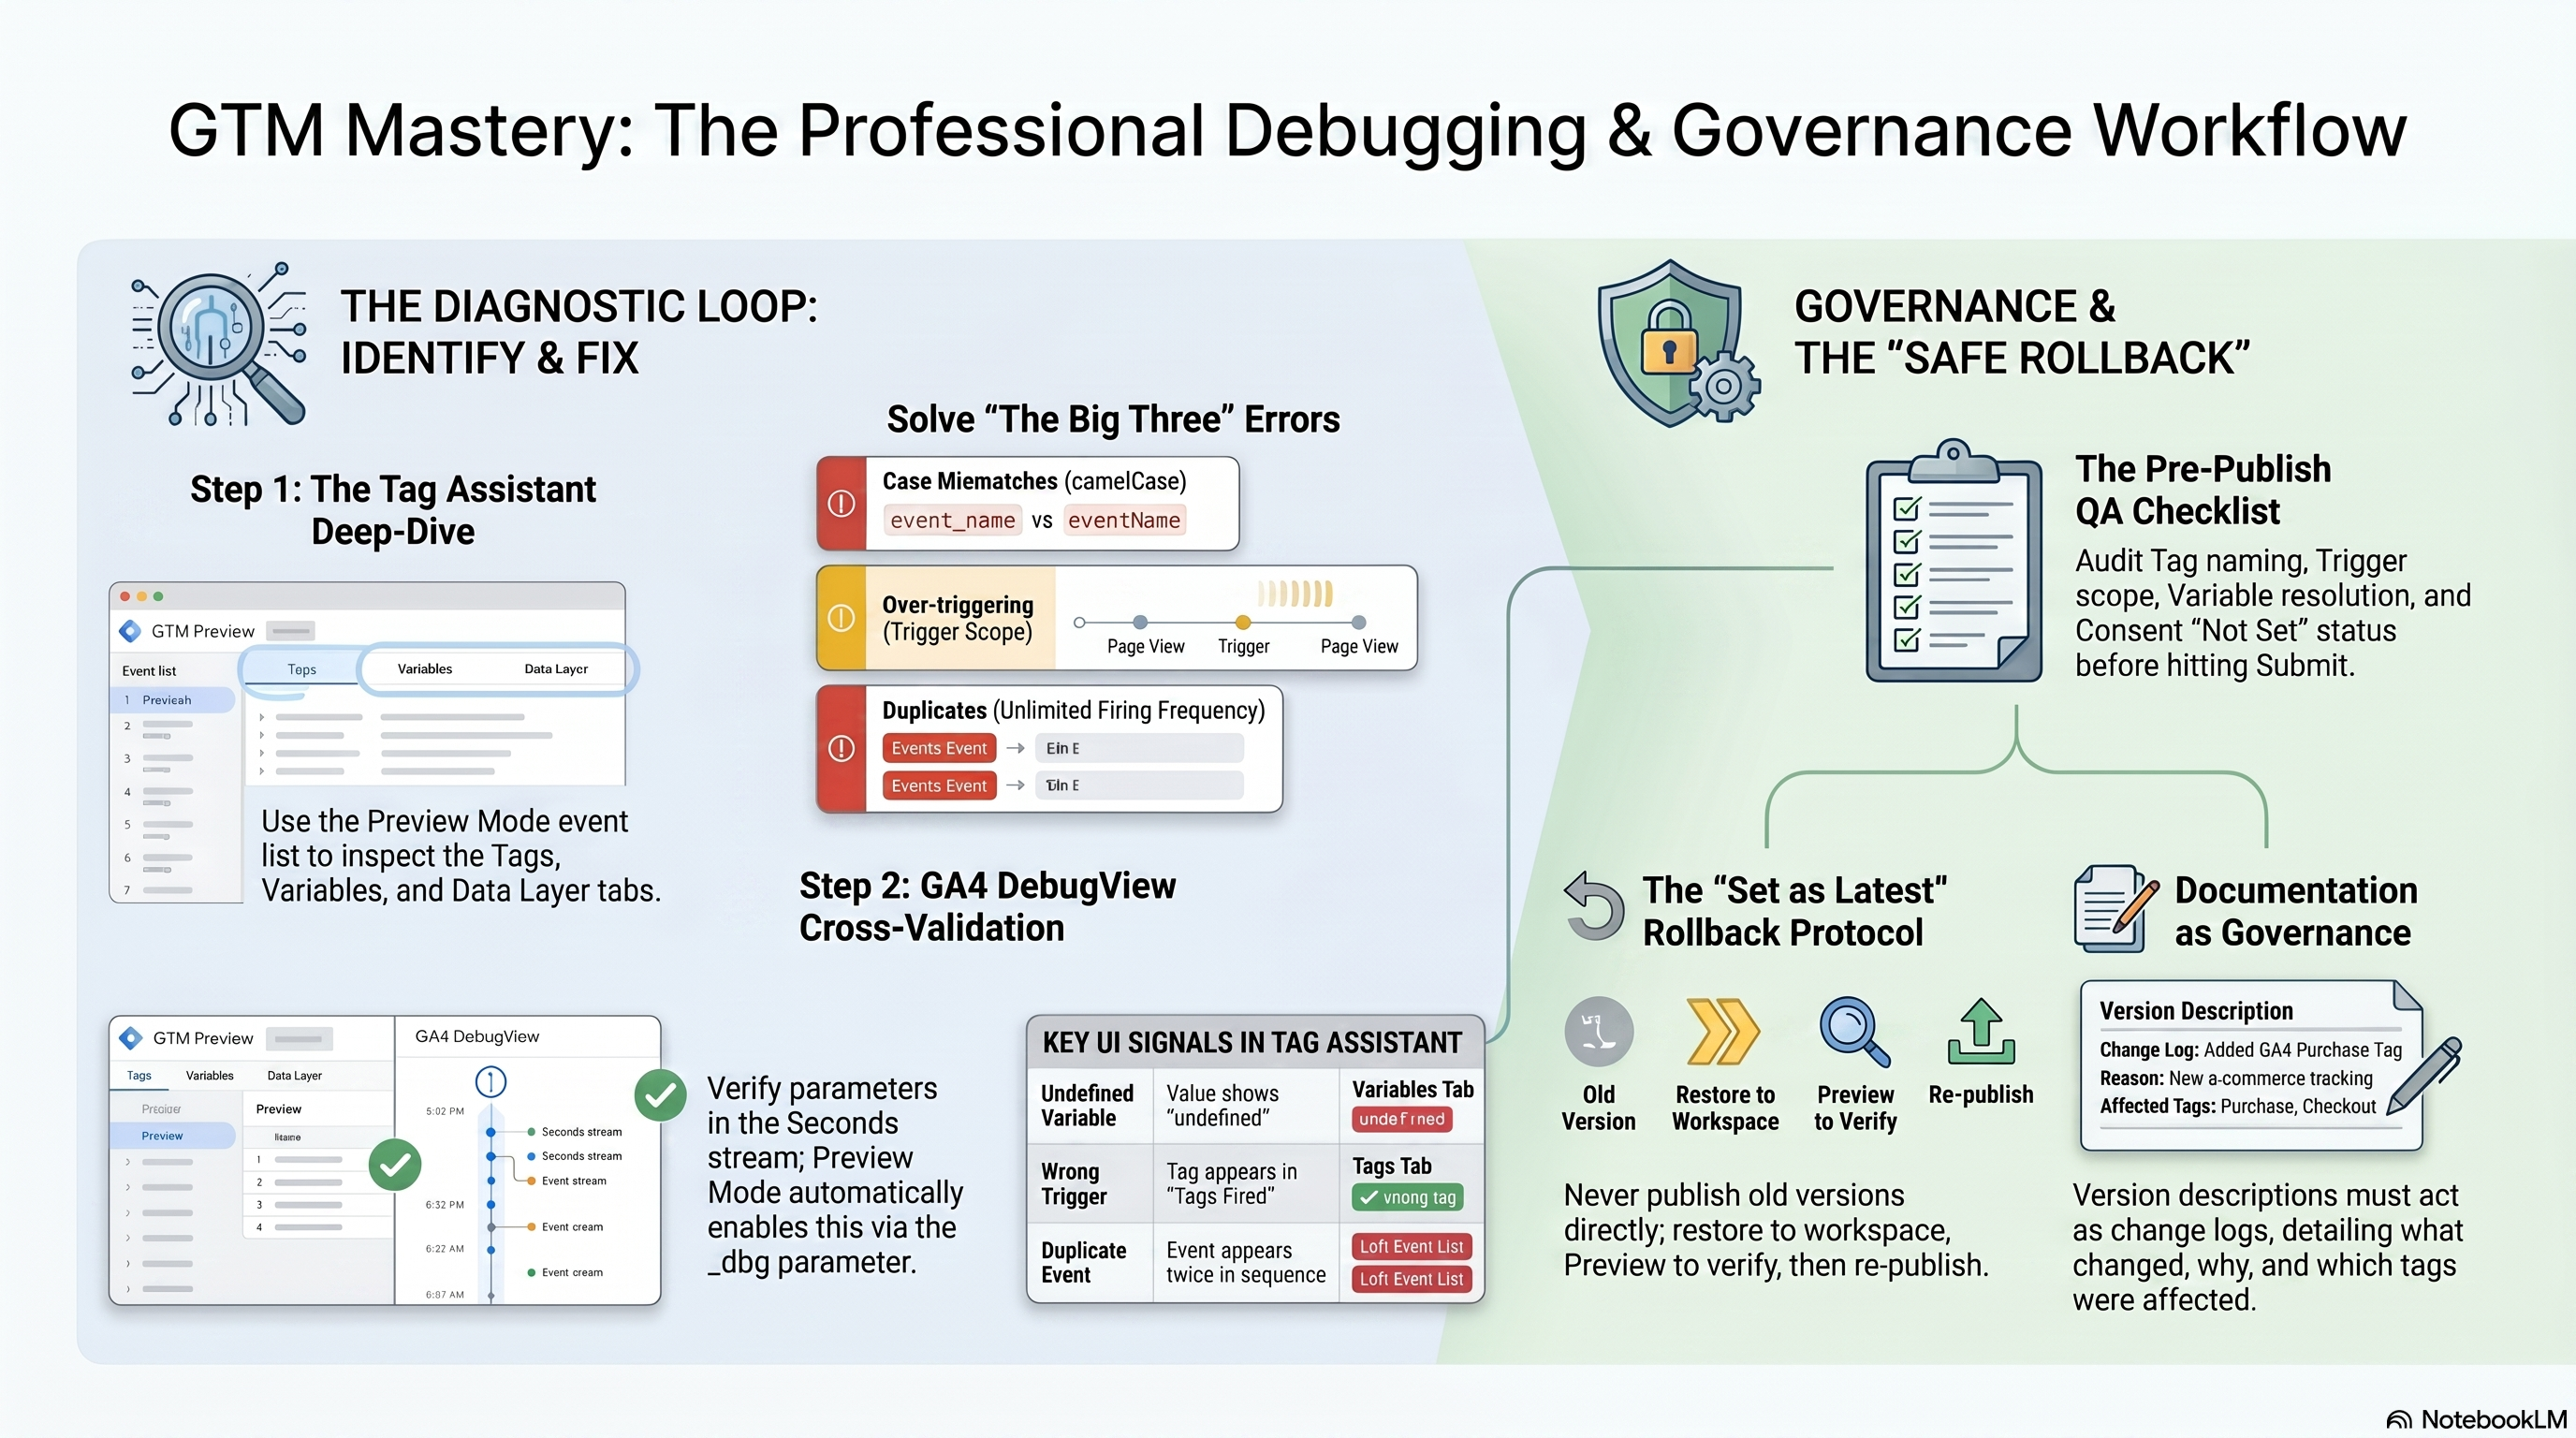
GTM Preview Mode does more than confirm a tag fired — it is a full-fidelity debugger for your entire container. When you click Preview in the Workspace tab, Tag Assistant opens at tagassistant.google.com and connects to your live site. Every subsequent page interaction generates a numbered event in the left-panel event list, in firing order.
For each event, four tabs reveal the complete picture: Tags (green "Fired" vs grey "Not Fired"), Variables (type, data type, and resolved value for every variable in scope), Data Layer (the complete state of the dataLayer object), and Output (structural errors and data layer updates). These four tabs are your primary diagnostic toolkit — before reaching for any other tool, exhaust them.
Preview and debug containers documents the variable chip toggle in the Tags tab, which switches each chip between the variable name and its resolved value. A chip showing undefined in resolved-value mode pinpoints a broken variable without having to read a list.
Three Error Scenarios: Reproduce, Diagnose, Fix
Scenario 1 — Variable returns undefined. An e-commerce site pushes OrderValue: 49.99 to the dataLayer (PascalCase), but the GTM Data Layer Variable is configured with name orderValue (camelCase). In Preview Mode: navigate to the confirmation page → click the purchase event → open the Variables tab → orderValue shows data type "undefined." Then open the Data Layer tab and confirm OrderValue: 49.99 is present. The casing mismatch is immediately visible side-by-side. Fix: standardize to orderValue in the dataLayer.push() call, or rename the GTM variable to match the existing key.
Scenario 2 — Tag fires on wrong trigger. A GA4 - begin_checkout tag should fire only on /checkout. The trigger is "Page URL contains checkout," which also matches /checkout-confirmation. In Preview Mode: navigate to /checkout-confirmation → click the Page View event → Tags tab shows the tag in "Tags Fired." Click the tag entry to expose its Firing Triggers — "Page URL contains checkout" is highlighted as the matched condition. Fix: change the trigger to "Page Path equals /checkout" (exact match), then re-run Preview Mode to verify the tag moves to "Not Fired" on /checkout-confirmation.
Scenario 3 — Duplicate event fires. A form_submit tag has Firing Frequency set to "Unlimited" and two overlapping triggers: Form Submission (All Forms) and a Custom Event named form_submitted. A single form submit fires both triggers simultaneously. In Preview Mode: submit the form → observe form_submit appearing twice in the event list in sequence. Each entry shows the tag in "Tags Fired" but with a different triggering event. Fix option A: change Firing Frequency from "Unlimited" to "Once per event." Fix option B: delete the redundant trigger and keep only the more specific one. Per Best practices for trigger configuration, "Once per event" is the correct default for any tag that should fire exactly once per user action.
Cross-Validating with GA4 DebugView
GA4 DebugView is not a separate tool you enable — when GTM Preview Mode is running, it automatically appends a _dbg parameter to every page URL, activating GA4 debug mode for that browser session. Monitor events in DebugView confirms that no debug_mode: true flag is required in the GA4 tag when testing through Preview Mode.
In GA4, navigate to Admin → DebugView. The Seconds stream shows the last 60 seconds of events; the Minutes stream covers the last 30 minutes across 30 time-circle slots. The cross-validation workflow for the duplicate event scenario above: after applying your fix, re-enter Preview Mode → submit the form → switch immediately to GA4 DebugView → watch the Seconds stream. One form_submit event in the stream confirms the fix. Two entries in the same second confirms the duplicate persists.
The standard QA loop is two monitors: Tag Assistant on one showing the Tags tab with parameter chips, GA4 DebugView on the other showing the Seconds stream. Preview Mode confirms the tag fired with the right values; DebugView confirms those values survived the hit and arrived at the GA4 property. Together they close the loop between GTM configuration and data collection.
Container Versioning: Publishing with a Change Log
Every GTM container publish creates an immutable version snapshot. The change log is written during the submission step, not after. Click Submit → under "Submission Configuration," select Publish and Create Version → enter a Version Name (e.g., GA4 purchase event + variable casing fix) and a Version Description that answers: what changed, which tags or triggers were affected, and why.
Publishing, versions, and approvals treats the description field as the equivalent of a git commit message. The Changes diff shown below the submission form is a final sanity check — the number of modified tags visible there should match your expectations before clicking Publish.
<Callout type="warning"> Skipping the Version Description costs you time during incidents. When a publish at 14:32 breaks page view tracking and you need the last-good version at 11:08, "added GA4 purchase tag, updated orderValue variable" versus "version 47" is the difference between a 2-minute rollback and a 20-minute archaeology session across a version list with no context. </Callout>
Rolling Back After a Bad Publish
Rolling back does not mean clicking Publish on an old version directly. The safe path: Versions tab → Actions menu (⋮) next to the target version → Set as Latest Version. This copies the selected version's configuration into the current workspace draft without going live. You then enter Preview Mode to verify the restored state solves the problem before publishing the rollback as a new version.
"Set as Latest Version" is the intended rollback mechanism. Publishing directly from the Versions tab skips the workspace review step and bypasses your pre-publish QA workflow. That shortcut is acceptable in a true production emergency, but "Set as Latest Version → Preview → Publish" is the correct default. The rollback itself creates a new version in the version history — your audit trail shows the incident and the recovery.
Pre-Publish QA Checklist
Run this before every container publish:
| Check | How to Verify |
|---|---|
| Naming convention | All new tags follow [Type] - [Platform] - [Action] |
| Trigger scope | Every trigger has at least one restricting condition beyond All Pages |
| Variable resolution | All variable chips show non-undefined values on target pages in Preview Mode |
| Firing frequency | No tag set to "Unlimited" without a documented reason in the version description |
| Consent state | Consent Overview (Admin → Container Settings) shows 0 tags with status "Not set" |
| GA4 cross-validation | At least one key event confirmed end-to-end in DebugView Seconds stream |
| Version description | Descriptive change log entered before clicking Publish |
Consent state is a check item here, not an implementation task. Configuring Consent Mode v2 and wiring the consent initialization trigger lives in 06-consent-mode-v2-privacy-tracking. Your responsibility at publish time is to flag any tag showing "Not set" in Consent Overview and block the publish until it is reviewed. How to fix it is ch6's territory — catching it before it ships is yours.
Hands-On Exercise: Debug a Broken Container
- Create a GTM Data Layer Variable named
testPrice(camelCase). - On your test page, push
dataLayer.push({'TestPrice': 9.99})(PascalCase — intentionally mismatched). - Enter Preview Mode. On the test page, open the Variables tab for the Page View event and confirm
testPriceresolves asundefined. Then open the Data Layer tab and observeTestPrice: 9.99with the wrong casing. - Fix the mismatch by correcting the push to
testPrice. Re-enter Preview Mode and verify the variable chip now shows9.99. - Attach a GA4 Event tag to a Custom Event trigger. In Preview Mode, push the event twice in the browser console within two seconds, then check GA4 DebugView's Seconds stream to confirm the event count matches your tag's Firing Frequency setting.
- Publish the container with a Version Name and a three-sentence Version Description covering what changed and why.
Success criteria: Variable chip shows the resolved numeric value (not undefined); GA4 DebugView event count per submission matches the Firing Frequency setting; Versions tab shows the new version with a populated, readable description.
Up next: 06-consent-mode-v2-privacy-tracking covers how to wire Consent Mode v2, configure default consent state, and verify that ad_storage and analytics_storage signals are correctly set before any tag fires — filling in the consent state check you just added to your QA workflow.
Consent Mode v2 and Privacy-Compliant Tracking for Performance Campaigns
Consent Mode v2: Four Parameters and the Upgrade from v1
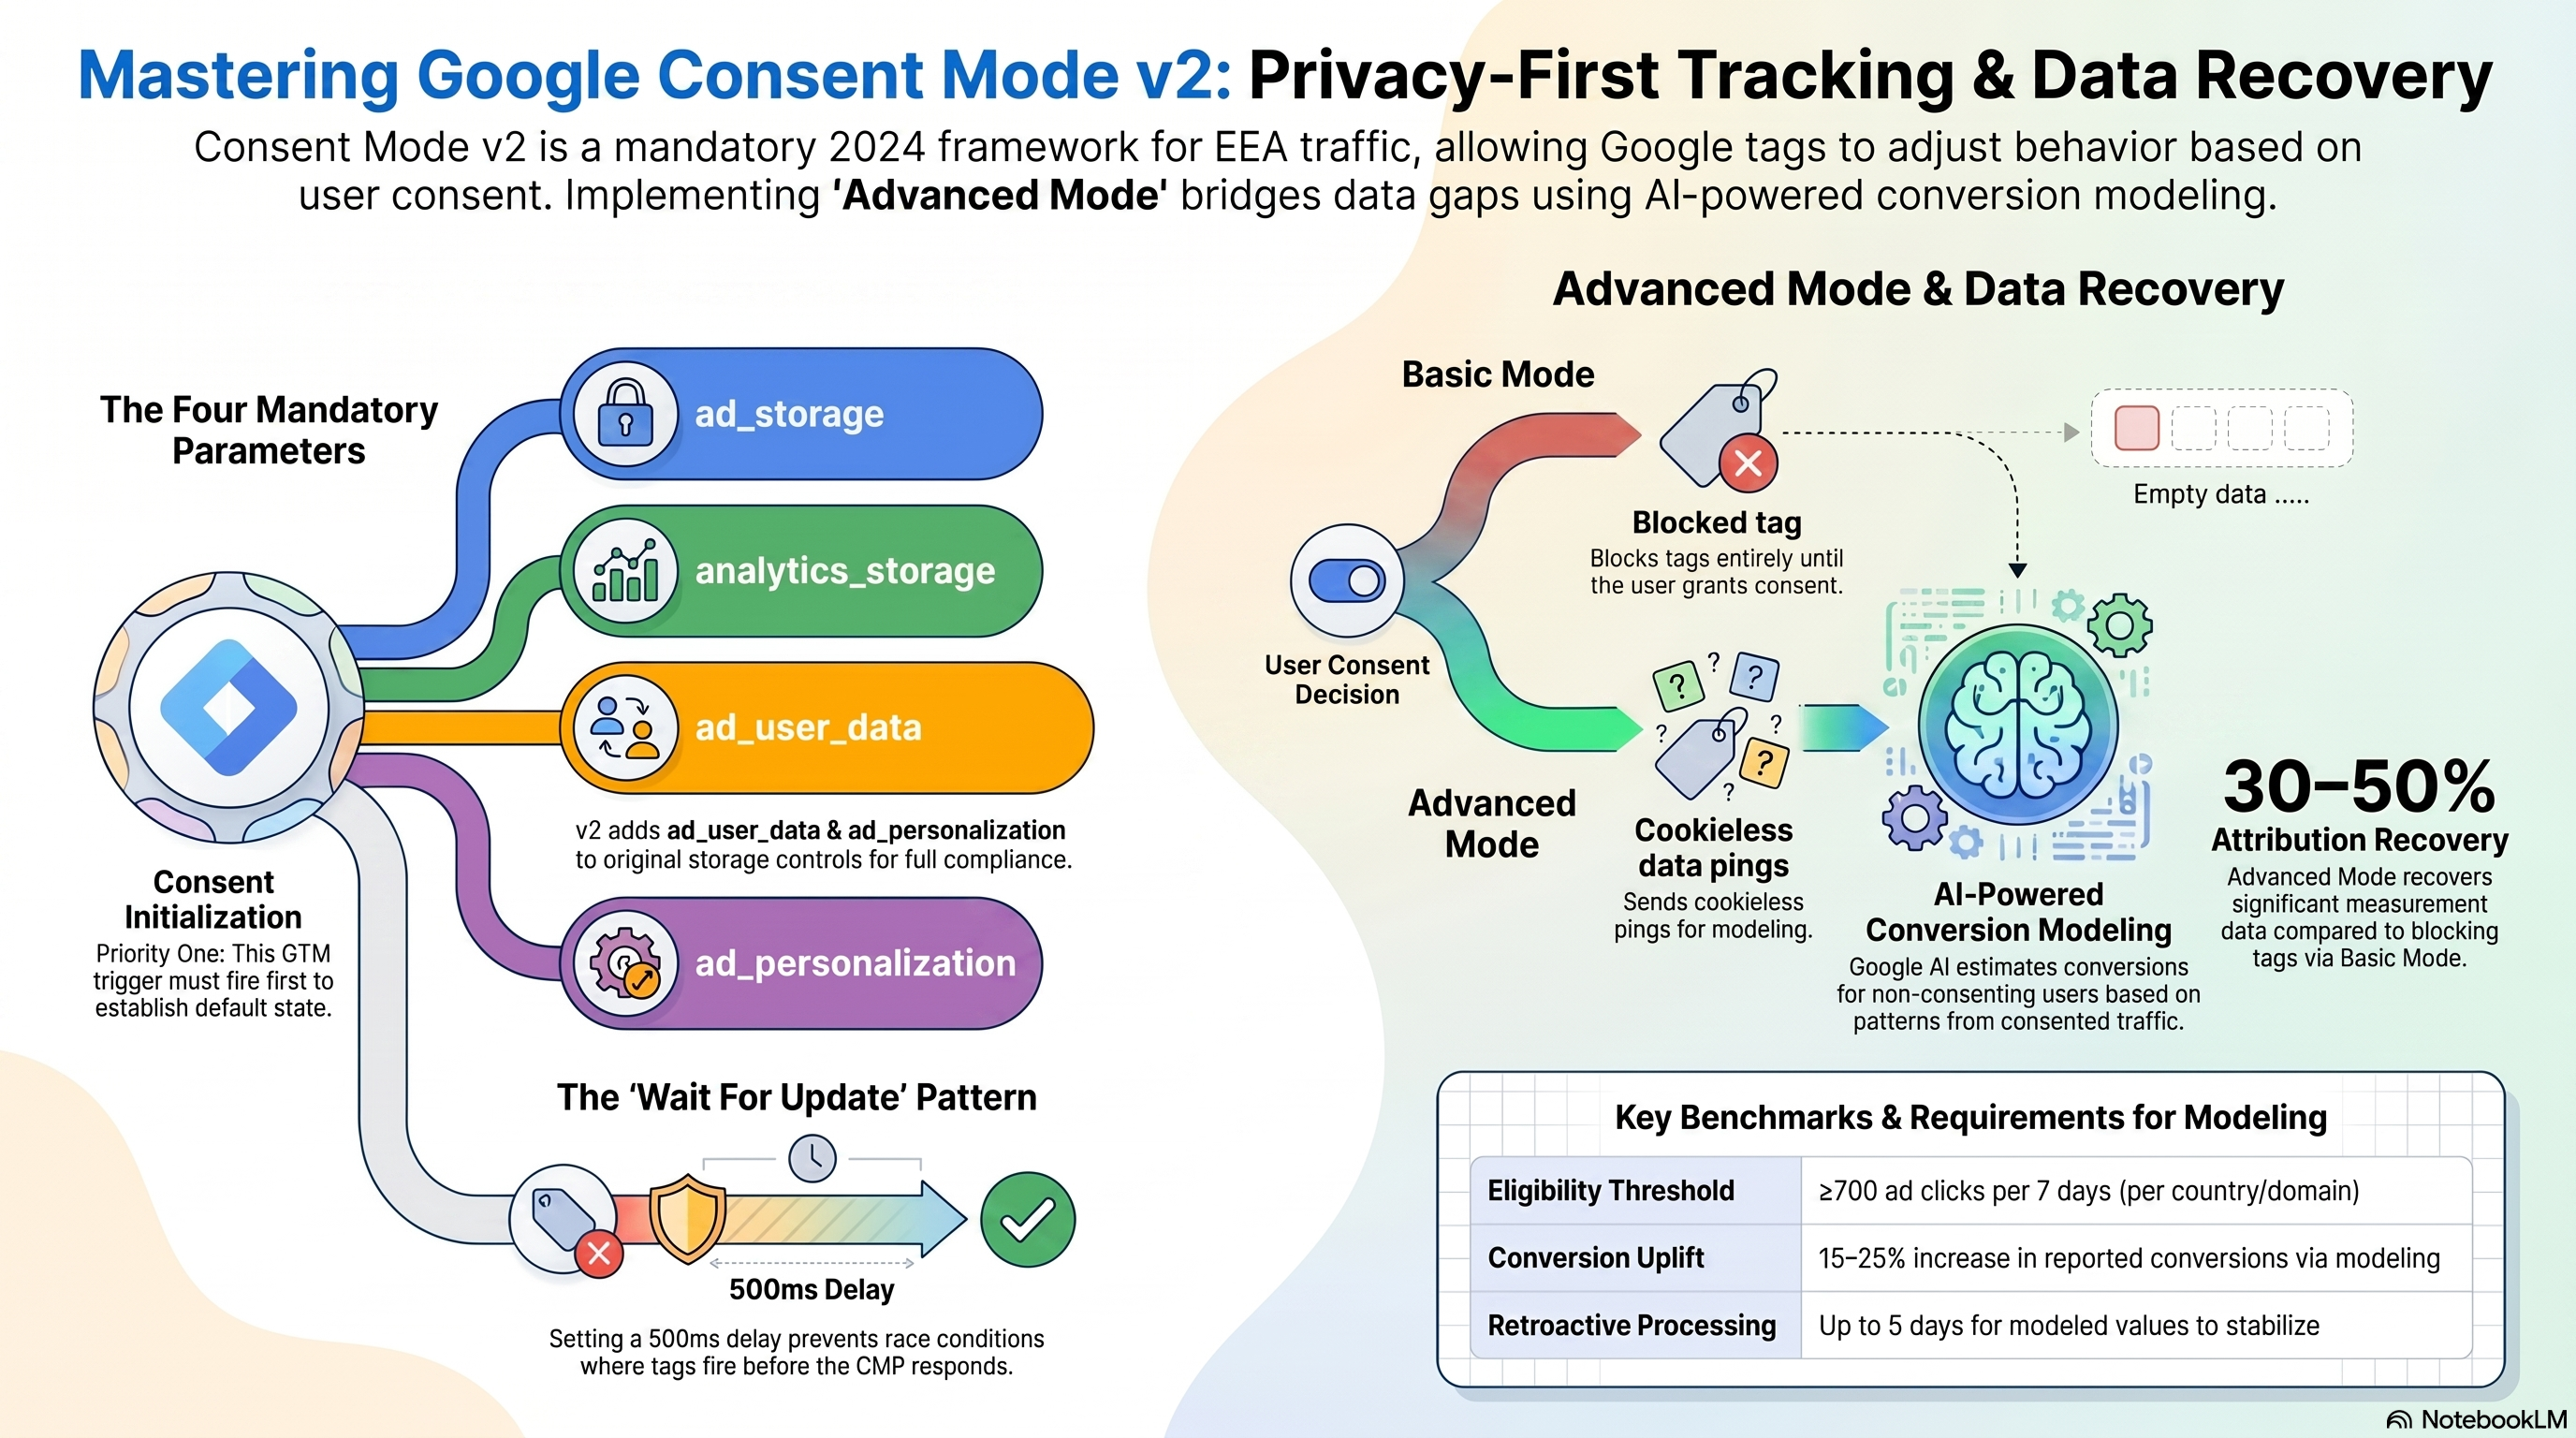
Google Consent Mode is the API layer between your cookie banner and your Google tags. Version 1 gave you two controls: ad_storage (whether Google's advertising tags can read or write cookies) and analytics_storage (whether analytics cookies can operate). Both accept only "granted" or "denied".
Version 2, launched November 2023, added two downstream parameters: ad_user_data and ad_personalization. Updates to Consent Mode for EEA Traffic These are not cookie controls. ad_user_data tells Google whether your implementation may send personal data—like hashed emails for Enhanced Conversions—to Google for advertising purposes. ad_personalization tells Google whether a user may receive personalized ads and be added to remarketing audiences. A common v2 mistake is setting only these two while believing cookies are blocked. ad_storage remains the sole parameter that prevents cookie read/write.
For EEA traffic under the updated EU User Consent Policy, all four parameters are required. Accounts still running v1 must upgrade, or risk under-reporting signals that Smart Bidding depends on.
The Consent Initialization Trigger: Fire-Order Guarantee
GTM triggers execute in this sequence: Consent Initialization → Initialization → all other triggers. That top slot exists for one purpose: to set the default consent state before any tag can read it. The built-in "Consent Initialization – All Pages" trigger ships with every GTM web container and is the only trigger you should attach to your consent default tag.
If another tag fires before the default is established, Tag Assistant reports: "A tag read consent state before a default was set." Without a default, Google's ad tags may treat the absence of a state as granted—the opposite of safe. Set your consent default tag's Tag Priority to 10 within the Consent Initialization phase to guarantee it fires before any CMP template also running on this trigger.
Tag Manager Consent Mode Support documents this trigger type as non-negotiable for a correct consent implementation.
Default Consent State: Denied by Default
Your default consent state tag runs a single gtag('consent', 'default', {...}) call. The denied-by-default pattern is the correct starting position for EEA users:
<script>
  window.dataLayer = window.dataLayer || [];
  function gtag(){dataLayer.push(arguments);}
  gtag('consent', 'default', {
    'ad_storage': 'denied',
    'analytics_storage': 'denied',
    'ad_user_data': 'denied',
    'ad_personalization': 'denied',
    'wait_for_update': 500
  });
</script>
The wait_for_update: 500 parameter is critical when your CMP loads asynchronously. It instructs Google tags to hold for up to 500 ms, allowing the CMP's update call to arrive first for returning visitors whose consent cookie already records a prior grant. Without it, those users see an unnecessary denial window on every page load. Set Up Consent Mode on Websites
Wiring Your CMP to GTM: The Consent Update Flow
When a user clicks "Accept All," your CMP must tell GTM which consent types were granted. The cleanest path is a CMP community template from GTM's Template Gallery—over 35 partner templates are available, including OneTrust, Cookiebot, and Usercentrics, each pre-wired to the CMP's own consent event schema.
For OneTrust: add the OneTrust CMP template, enter your Script ID, enable "Use Google Consent Mode?", map each OneTrust category to its consent parameter (Performance cookies → analytics_storage; Targeting cookies → ad_storage, ad_user_data, ad_personalization), set all four defaults to denied, and trigger on Consent Initialization – All Pages. When a user accepts, the template automatically fires gtag('consent', 'update', {...}) with granted values—no custom trigger needed.
If you hand-roll a custom update instead of using a template, you must create a Custom Trigger listening for your CMP's exact event name and maintain that integration manually as the CMP's event schema evolves. Use the official template.
What Fires, What Blocks, and What Is Modelled
The outcome when consent is denied depends on which implementation mode you chose—and this choice directly affects Smart Bidding quality.
Advanced Mode (recommended): Tags fire immediately with denied consent state, sending cookieless pings—minimal, cookie-free measurement signals. Google uses these pings for advertiser-specific conversion modelling, recovering 30–50% more attribution than Basic Mode.
Basic Mode: Tags are completely blocked until consent is granted. Only general, non-advertiser-specific modelling is available. Choose Basic Mode only when a legal review explicitly requires it; for most performance advertisers, it is the wrong default.
When ad_storage is denied in Advanced Mode, your Google Ads Conversion and GA4 tags fire but cannot access cookies. Consent Mode Overview The gcd URL parameter on each hit encodes all four consent states so Google can correctly model from the signal. When ad_storage is granted, both tags fire normally with full cookie access.
<Callout type="warning"> Advanced Mode fires tags as cookieless pings when consent is denied; Basic Mode blocks them entirely. If your container silently uses Basic Mode, Smart Bidding loses 30–50% of its attribution signal compared to Advanced Mode. Confirm your mode in the GTM Consent tab before publishing. </Callout>
Verifying Consent State in GTM Preview
Open GTM Preview, connect to your site, and interact with the cookie banner. In Tag Assistant, click the Consent tab. Two events must appear:
- Consent (default) — the earliest event, from your Consent Initialization tag. Verify all four parameters show
denied. - Consent (update) — fired after user interaction. Verify accepted categories show
granted.
If the Consent tab is empty, consent mode is not implemented—Troubleshoot Consent Mode with Tag Assistant lists this as the first-pass diagnostic.
For tag-level verification: select your Google Ads Conversion tag and check the consent column. In Advanced Mode, ad_storage: denied appears alongside a "Fired" status—the tag sent a cookieless ping, not a full hit, and that is correct. In Basic Mode, the same scenario shows "Not Fired" with a consent block reason. Test both paths explicitly: reject cookies and confirm the denied state; accept and confirm ad_storage: granted with a full hit.
Modelled Conversions: Smart Bidding with a Consent Gap
When part of your audience declines cookies, Google AI estimates those conversions using behavioral patterns from consented users. Consented users convert 2–5× more frequently than unconsented users in Google's models, providing a strong statistical prior. About Consent Mode Modelling
Modelled conversions appear in the standard Conversions column alongside observed conversions—not in a separate column. Smart Bidding reads the combined total as its optimization signal and bids correctly for the non-consenting segment rather than treating it as zero-conversion traffic.
To confirm modelling is active: open Google Ads → Measurement → Consent Mode Impact report. If no modelled conversions appear despite a correct implementation, check volume: Google requires ≥700 ad clicks per 7-day period per country+domain grouping before modelling activates.
Hands-On Exercise: Full Consent Mode v2 Implementation
Implement Consent Mode v2 on a GTM Preview-connected page.
Steps:
- Create a Custom HTML tag with
gtag('consent', 'default', {...})denying all four parameters andwait_for_update: 500. Trigger: Consent Initialization – All Pages. Tag Priority: 10. - Add a CMP community template from GTM Template Gallery (or simulate a consent update via a custom event firing
gtag('consent', 'update', {...})). - Open GTM Preview. Load the page without touching the banner. In Tag Assistant → Consent tab, confirm the default event shows all four parameters as
denied. - Accept the cookie banner. Confirm a second Consent (update) event shows
ad_storage: grantedandanalytics_storage: granted. - Load a page with your Google Ads Conversion tag. Reject all cookies. Verify the tag shows
ad_storage: deniedand status "Fired" (Advanced Mode cookieless ping). - Accept cookies. Verify
ad_storage: grantedand the conversion tag fires a full hit.
Success criteria: Two consent events in Tag Assistant (default → update); conversion tag shows denied state in the reject path and granted state in the accept path; no "tag read consent before default was set" warning.
Next chapter: 07-auditing-container-maintenance adds consent compliance to the recurring quarterly review that keeps your container accurate over time.
GTM Auditing and Ongoing Container Maintenance for Performance Teams
Tag bloat is structural: every GTM container drifts toward redundancy as campaigns rotate and teams add pixels without removing old ones. This chapter gives you the audit methodology, DevTools benchmarking workflow, and governance calendar to keep your container lean and defensible.
Diagnosing Tag Bloat: The Full Audit Methodology
GTM containers have a hard size cap of 300 KB. The GTM UI warns at 70% of that limit (≈210 KB). A container can hit this threshold with only 20–30 active tags because GTM does not cascade-delete: when you remove a tag, its associated triggers and variables remain in the payload — the primary source of containers near the warning threshold.
Export the container JSON from GTM Admin → Export Container. Then identify bloat across four categories:
- Legacy platform tags — Universal Analytics (
analytics.js, GA3 property IDs) was sunset March 2023. Any UA tag is dead weight; delete it. - Expired campaign pixels — a Meta custom event from 18 months ago; a Criteo pixel whose contract lapsed. Cross-reference against active SaaS contracts.
- Duplicate tags — more than one GA4 tag firing
page_viewto the same Measurement ID is always redundant. - Orphaned triggers and variables — after each deletion batch, open Triggers and Variables, sort by "used by 0 tags," and remove what surfaces.
Pause or Delete? Making the Right Call
The distinction matters because it directly affects container size. According to Google's documentation, paused tags are excluded from the published container entirely, reducing its byte payload. Blocking a tag via a blocking trigger keeps the full tag code inside the container — it just doesn't fire. Blocking does nothing for container size.
The decision rule:
- Pause first when stakeholders haven't confirmed whether a campaign will restart, or when you're uncertain the tag is obsolete. Pausing preserves the full tag configuration — triggers, variables, settings — so restoration is fast.
- Delete after a 14–30 day hold period with no reactivation request. Then immediately audit for orphaned triggers and variables.
- Delete immediately for confirmed-obsolete entries only: any Universal Analytics tag, any tag tied to a vendor account confirmed closed, any exact duplicate.
Benchmarking Page Load Impact with Browser DevTools
Quantifying weight reduction turns an audit into a stakeholder-ready result.
- Open Chrome DevTools (F12) → Network tab. Check Disable cache and set throttling to Fast 3G.
- Hard-reload (
Ctrl+Shift+R). Filter bydomain:googletagmanager.comand record the Size column forgtm.js— bytes transferred over the network, per the Chrome DevTools documentation. Also note the Performance tab's yellow Scripting duration for JavaScript execution cost. - Publish your cleaned container and repeat steps 1–2.
The cache-disable step is non-negotiable. A warm-cache reload shows near-zero script load times and will make a real improvement invisible. A realistic benchmark: a 47-tag container cleaned to 31 tags reduces gtm.js from 85 KB to 58 KB and cuts scripting time from 1,840 ms to 1,210 ms.
Building a Tracking Plan (Solution Design Reference)
The tracking plan (also called a Solution Design Reference, or SDR) maps every business KPI to the tag, trigger, and dataLayer event responsible for measuring it. It's the hit-by-a-bus document: anyone onboarding can reconstruct every implementation decision without opening GTM.
The Events tab must contain, at minimum: Event Name, KPI Mapped, GTM Tag, GTM Trigger, dataLayer Push Required (yes/no plus expected schema), and Consent Category (analytics_storage, ad_storage). A companion Tools tab tracks active platforms with property/account IDs, owners, and last verification dates.
The SDR must be updated at every GTM publish — not afterward as optional documentation. Per MeasureSchool's GTM audit guide, an SDR abandoned after project start causes new team members to create duplicate tags for events the document still shows as "not yet implemented."
The Quarterly Review: Four Checkpoints
Run deep audits on a quarterly cadence, stepping through four checkpoints in order:
1. Tag Relevance — Cross-reference every active tag against the current vendor stack and campaign calendar. Flag tags for campaigns that ended more than 30 days ago and tags for platforms not in current SaaS contracts.
2. Trigger Accuracy — Walk key user journeys in GTM Preview Mode. Confirm purchase and conversion tags fire only on the confirmation page. Confirm form submission triggers use the Form Submission type, not click triggers — clicks fire even when client-side validation fails, inflating conversion counts.
3. Variable Integrity — In Preview Mode, inspect dataLayer values for key events. Verify transaction_id is unique per order, value is numeric, and currency matches the expected ISO code. Confirm consent-gated variables are inaccessible before consent is granted.
4. Consent Compliance — Verify every marketing tag has ad_storage and ad_personalization consent settings configured. Simulate a consent-denied EEA session and confirm the Network panel shows no requests to conversion or pixel endpoints. Consent Mode v2 implementation lives in 06-consent-mode-v2-privacy-tracking; this checkpoint verifies it.
<Callout type="warning"> Consent Mode v2 became mandatory for EEA and UK traffic on July 21, 2025. GTM does not enforce tag firing order by default — on a fast connection, a Google Ads conversion tag can execute before a consent initialization tag. The only reliable fix is tag sequencing: configure the consent init tag as a setup tag on every marketing tag. Verify this at every quarterly review; it is a GDPR compliance checkpoint, not optional housekeeping. </Callout>
Campaign-Cycle Maintenance Workflow
The quarterly calendar sets the baseline; campaign gates add precision. Align three touchpoints to every campaign:
Pre-launch (2–3 days before go-live): Activate campaign tags. Verify in Preview Mode that they fire only on designated campaign pages. Publish with a version name that includes the campaign name and launch date.
Mid-flight (7 days in): Check conversion tag firing counts in GA4 Debug View and Google Ads conversion columns. Confirm no duplicate conversions per order. If new campaign tags push container size past the 70% warning, pause lower-priority tags.
Post-campaign (within 5 business days of campaign end): Pause all campaign-specific tags — do not delete yet, hold 14 days. Remove campaign-specific triggers and variables not shared with other active tags. Update the SDR: set Active to No, record the end date. Publish with version description: "Post-campaign cleanup — [campaign name] — [date]."
Documentation and Handoff Standards
The GTM Versions screen records who published each version and when — the primary audit trail for multi-user containers. Version names must identify the right snapshot under rollback pressure: include the change summary, date, and counts of modified tags/triggers/variables.
Simo Ahava's GTM Tools Sheets add-on auto-generates four-tab documentation (version metadata, tags, triggers, variables) from any published container version with changed fields highlighted. Run it on every quarterly review and store the output with the SDR.
Hands-on Exercise: Container Audit and DevTools Baseline
Using a live or staging GTM container you have access to:
- Open Chrome DevTools → Network, disable cache, throttle to Fast 3G, hard-reload. Record the Size value for
gtm.js. - Identify at least two tags for pausing or deletion (legacy platform, expired campaign, or duplicate). Pause them and publish with a descriptive version name.
- Repeat the DevTools measurement. Record the before/after
gtm.jssize delta. - Open Triggers and Variables, sort by "used by 0 tags," and remove orphans.
- Add one Events row to a tracking plan spreadsheet for a tag you audited, with all required columns.
Success criteria: gtm.js size decreases in the after measurement, orphaned triggers and variables cleared, and the SDR Events row contains Event Name, KPI Mapped, GTM Tag, GTM Trigger, dataLayer Push Required, and Consent Category.
This is the final chapter of Google Tag Manager Mastery. You now have the complete lifecycle: build (ch1–ch4), debug and govern (ch5), protect consent (06-consent-mode-v2-privacy-tracking), and sustain performance in production.