Technical & Advanced SEO: Audits, On-Page, and Link Strategy for Performance Marketers
Mid-level marketers targeting Performance Marketing Specialist roles who manage paid acquisition and need to extend their fluency to organic/technical SEO — particularly those working in travel, OTA, or e-commerce verticals where crawl health and link strategy directly affect revenue.
- Configure robots.txt, XML sitemaps, and canonical tags to control how Googlebot and AI bots crawl and index a site
- Run a structured Screaming Frog + GSC audit and produce a prioritized fix backlog ranked by traffic impact
- Measure LCP, INP, and CLS against 2026 thresholds and write a developer-ready performance brief
- Audit and rewrite title tags, implement JSON-LD schema for three entity types, and build a topic-cluster internal link structure
- Audit a backlink profile in Ahrefs/SEMrush, build a disavow file, and pitch a 90-day link-earning campaign
- Translate SEO findings into sprint-ready developer tickets and manage organic visibility through a site migration
Crawlability, Indexation & Site Architecture Fundamentals
How Googlebot Discovers and Indexes Pages
Search engines operate in three phases: crawl, index, serve. Googlebot discovers URLs by following links across the web and by reading XML sitemaps you submit. It fetches each URL, renders the page using headless Chromium, and passes the content to the indexer. The indexer selects a canonical URL to store and decides whether to include the page in search results.
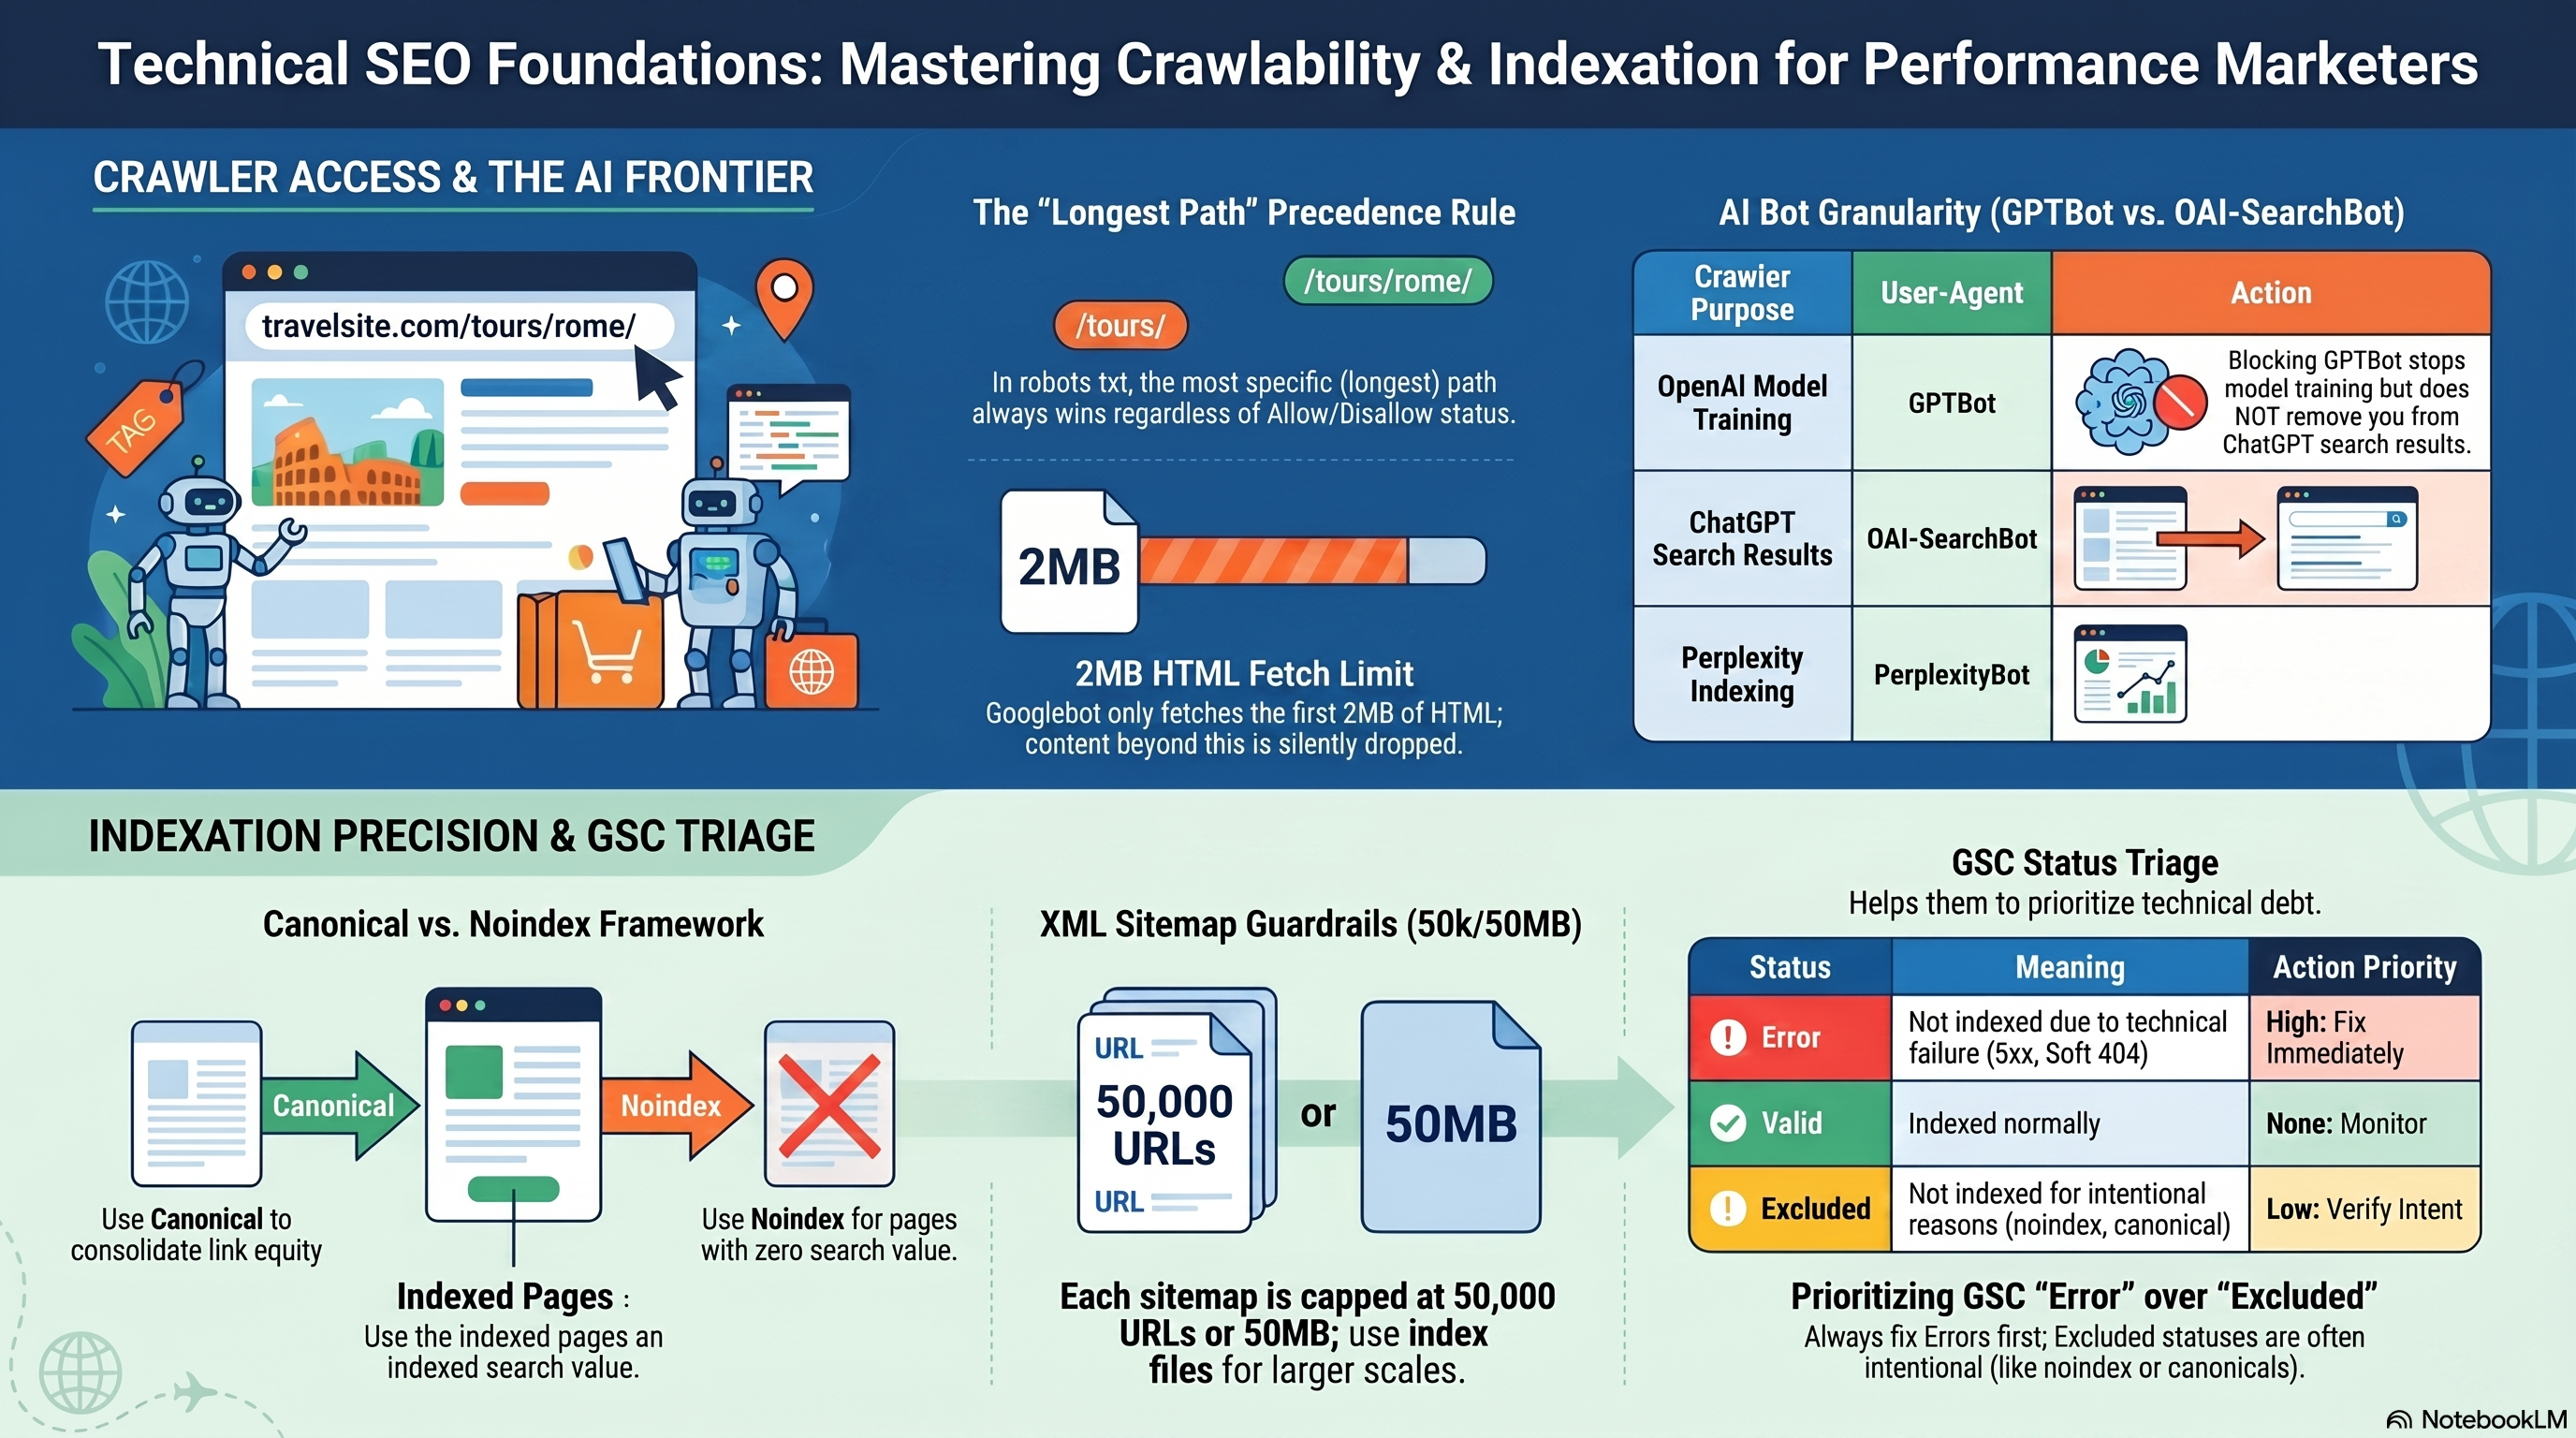
Two facts to internalize before anything else. First, robots.txt is a hint, not a lock — Googlebot respects it, but a disallowed page can still appear in search results if external sites link to it (shown without a snippet). Second, Googlebot fetches up to 2 MB of HTML per URL; content beyond that threshold is silently dropped, which matters for long single-page applications.
Controlling Crawler Access with robots.txt
The robots.txt file lives at https://example.com/robots.txt. It uses the Robots Exclusion Protocol: declare a User-agent: target, then list Disallow: and Allow: rules beneath it.
Precedence rule: When two rules match the same URL at different path lengths, the longer (more specific) path wins. When paths are equal length, Allow beats Disallow. This is the most-tested rule in crawl audits and the most common misconfiguration vector — know it cold.
In 2026, robots.txt must manage a fleet of AI crawlers, each with a distinct user-agent:
| Crawler purpose | User-agent |
|---|---|
| Google search ranking | Googlebot |
| Google AI model training | Google-Extended |
| OpenAI model training | GPTBot |
| ChatGPT search results | OAI-SearchBot |
| Anthropic model training | ClaudeBot |
| Perplexity search indexing | PerplexityBot |
A critical distinction: blocking GPTBot prevents OpenAI training data collection but does not exclude the site from ChatGPT search answers — that requires a separate OAI-SearchBot rule. The same separation applies to Anthropic's crawlers: ClaudeBot handles training; Claude-SearchBot handles real-time search.
Never block JavaScript or CSS files in robots.txt. Googlebot renders pages with headless Chromium; blocking .js and .css paths degrades rendering quality and produces "Indexed, though blocked by robots.txt" warnings in GSC.
XML Sitemaps and GSC Submission
A sitemap is your crawl invitation list — a structured declaration of URLs you want Google to discover. The XML sitemap protocol caps each file at 50,000 URLs and 50 MB uncompressed. Sites exceeding that limit use a sitemap index file that points to multiple individual sitemaps, each under the cap.
The only field Google actually uses: <lastmod>, and only when it accurately reflects actual page modification dates. <changefreq> and <priority> are explicitly ignored — setting <priority>1.0</priority> on every URL provides zero crawl benefit.
To submit: in GSC go to Indexing → Sitemaps, enter the sitemap URL, and click Submit. The Sitemaps report shows last-read date, URL count, and processing errors. A "Couldn't fetch" error almost always means the URL you entered doesn't match the actual file path — verify it in a browser before troubleshooting further.
Canonical Tags and noindex
rel="canonical" is a strong hint, not a directive: <link rel="canonical" href="https://example.com/preferred-url/"> in the <head>. Google may override your canonical if the specified page has quality problems — slow load, HTTPS issues, or conflicting signals. You will see this as "Duplicate, Google chose different canonical" in the Page Indexing report's Excluded section. Every indexable page should carry a self-referencing canonical to prevent parameter variants and tracking-appended URLs from fragmenting canonical signals.
noindex (<meta name="robots" content="noindex">) tells Google not to index the page. One hard constraint: the page must be crawlable for Google to read the tag. If robots.txt blocks the URL, the noindex tag is never discovered and the page can still appear in results via link-based discovery.
Decision framework for near-duplicate pages:
- Use canonical when you want link equity consolidated from any external backlinks pointing at the duplicate, or when the page serves users but has near-identical content (e.g., print-friendly variants, filtered e-commerce listing pages).
- Use noindex when the page should never appear in search results and no link equity consolidation is needed (e.g., internal search results, cart pages, checkout steps).
- Never use both on the same page. Google explicitly warns that noindex + canonical is a contradictory combination — one blocks indexing, the other declares equivalence to an indexed URL.
Crawl Budget
Crawl budget is the product of two factors: crawl capacity (the maximum crawl rate Google allocates based on your server's responsiveness) and crawl demand (how strongly Google wants to crawl based on URL freshness, popularity, and perceived value). Crawl rate — the speed at which Googlebot fetches pages — can be reduced but not increased via GSC settings.
<Callout type="warning"> Crawl budget is a practical concern only for sites with hundreds of thousands of URLs, high publish frequency, or heavy JavaScript rendering. For sites under 10,000 pages with clean architecture, crawl budget is rarely a bottleneck. </Callout>
Three signals that a large site has a crawl budget problem: (1) GSC shows a growing "Discovered — currently not indexed" count with no corresponding Error reason; (2) newly published pages take 7+ days to appear in URL Inspection despite being submitted in the sitemap; (3) server logs reveal Googlebot spending significant time on /cart/, /checkout/, session-parameterized, or paginated search URLs. The fix is robots.txt blocking of low-value URL patterns and returning 404/410 responses for discontinued pages rather than soft 404s.
Site Architecture and Orphaned Pages
A URL hierarchy map shows how deep each page sits from the homepage and which URLs share parent paths. Orphaned pages — URLs that exist but have no internal links pointing to them — are invisible to Googlebot's link-following pass and typically receive little crawl budget.
The only way to find orphaned pages is to compare a complete URL list (from sitemap, server logs, or analytics exports) against your internal link graph. This is an internal link gap audit used as a crawlability diagnostic: you're identifying which pages Googlebot cannot reach by following links — not distributing link equity. Internal link equity strategy and topic-cluster linking belong to 04-on-page-optimization-structured-data.
Reading the GSC Page Indexing Report
The Page Indexing report (formerly Index Coverage) classifies every URL Google has discovered into four statuses:
| Status | Meaning | Response |
|---|---|---|
| Error | Not indexed; a problem exists | Investigate and fix |
| Valid with warning | Indexed but issues present | Review case by case |
| Valid | Indexed normally | None needed |
| Excluded | Not indexed; intentional or acceptable | Verify it's expected |
The most common confusion: treating the total Excluded count as a measure of indexation failure. Excluded covers pages with noindex, pages where Google selected a different canonical, robots.txt-blocked URLs, and duplicate pages Google deduped — most of which are working as intended. Audit the Excluded sub-reason breakdown rather than the aggregate number. Error statuses always deserve investigation; Excluded statuses deserve verification.
Hands-On Exercise: Baseline Crawlability Audit (15–20 min)
Tools required: Google Search Console (free), access to your site's robots.txt URL.
Step 1 — robots.txt review. Open https://yourdomain.com/robots.txt in a browser. Answer: Is there a User-agent: * catchall? Are any AI crawlers (GPTBot, ClaudeBot, PerplexityBot) explicitly allowed or blocked? In GSC, go to Settings → robots.txt to use the built-in tester and confirm rules parse as expected.
Step 2 — Sitemap status check. In GSC, go to Indexing → Sitemaps. If no sitemap is submitted, create a minimal XML sitemap and submit it now. Note the URL count and last-read date. Record any processing errors.
Step 3 — Page Indexing triage. Go to Indexing → Pages. Record: total Error count, the top two error reasons by volume, and the three largest Excluded sub-reasons. For each Error reason, open one example URL in URL Inspection and note the recommended fix.
Success criteria: You can name one Error status item and its specific remediation, and confirm whether your top Excluded sub-reason is intentional (e.g., noindex on checkout pages) or a misconfiguration (e.g., a key landing page showing "Excluded by noindex tag" that was never meant to have one).
02-technical-seo-audit-screaming-frog covers how to run a full crawl with Screaming Frog to systematically surface and prioritize every issue category you've identified in this baseline.
Running a Full Technical SEO Audit with Screaming Frog & GSC
Configure Your Crawl Before You Click Start
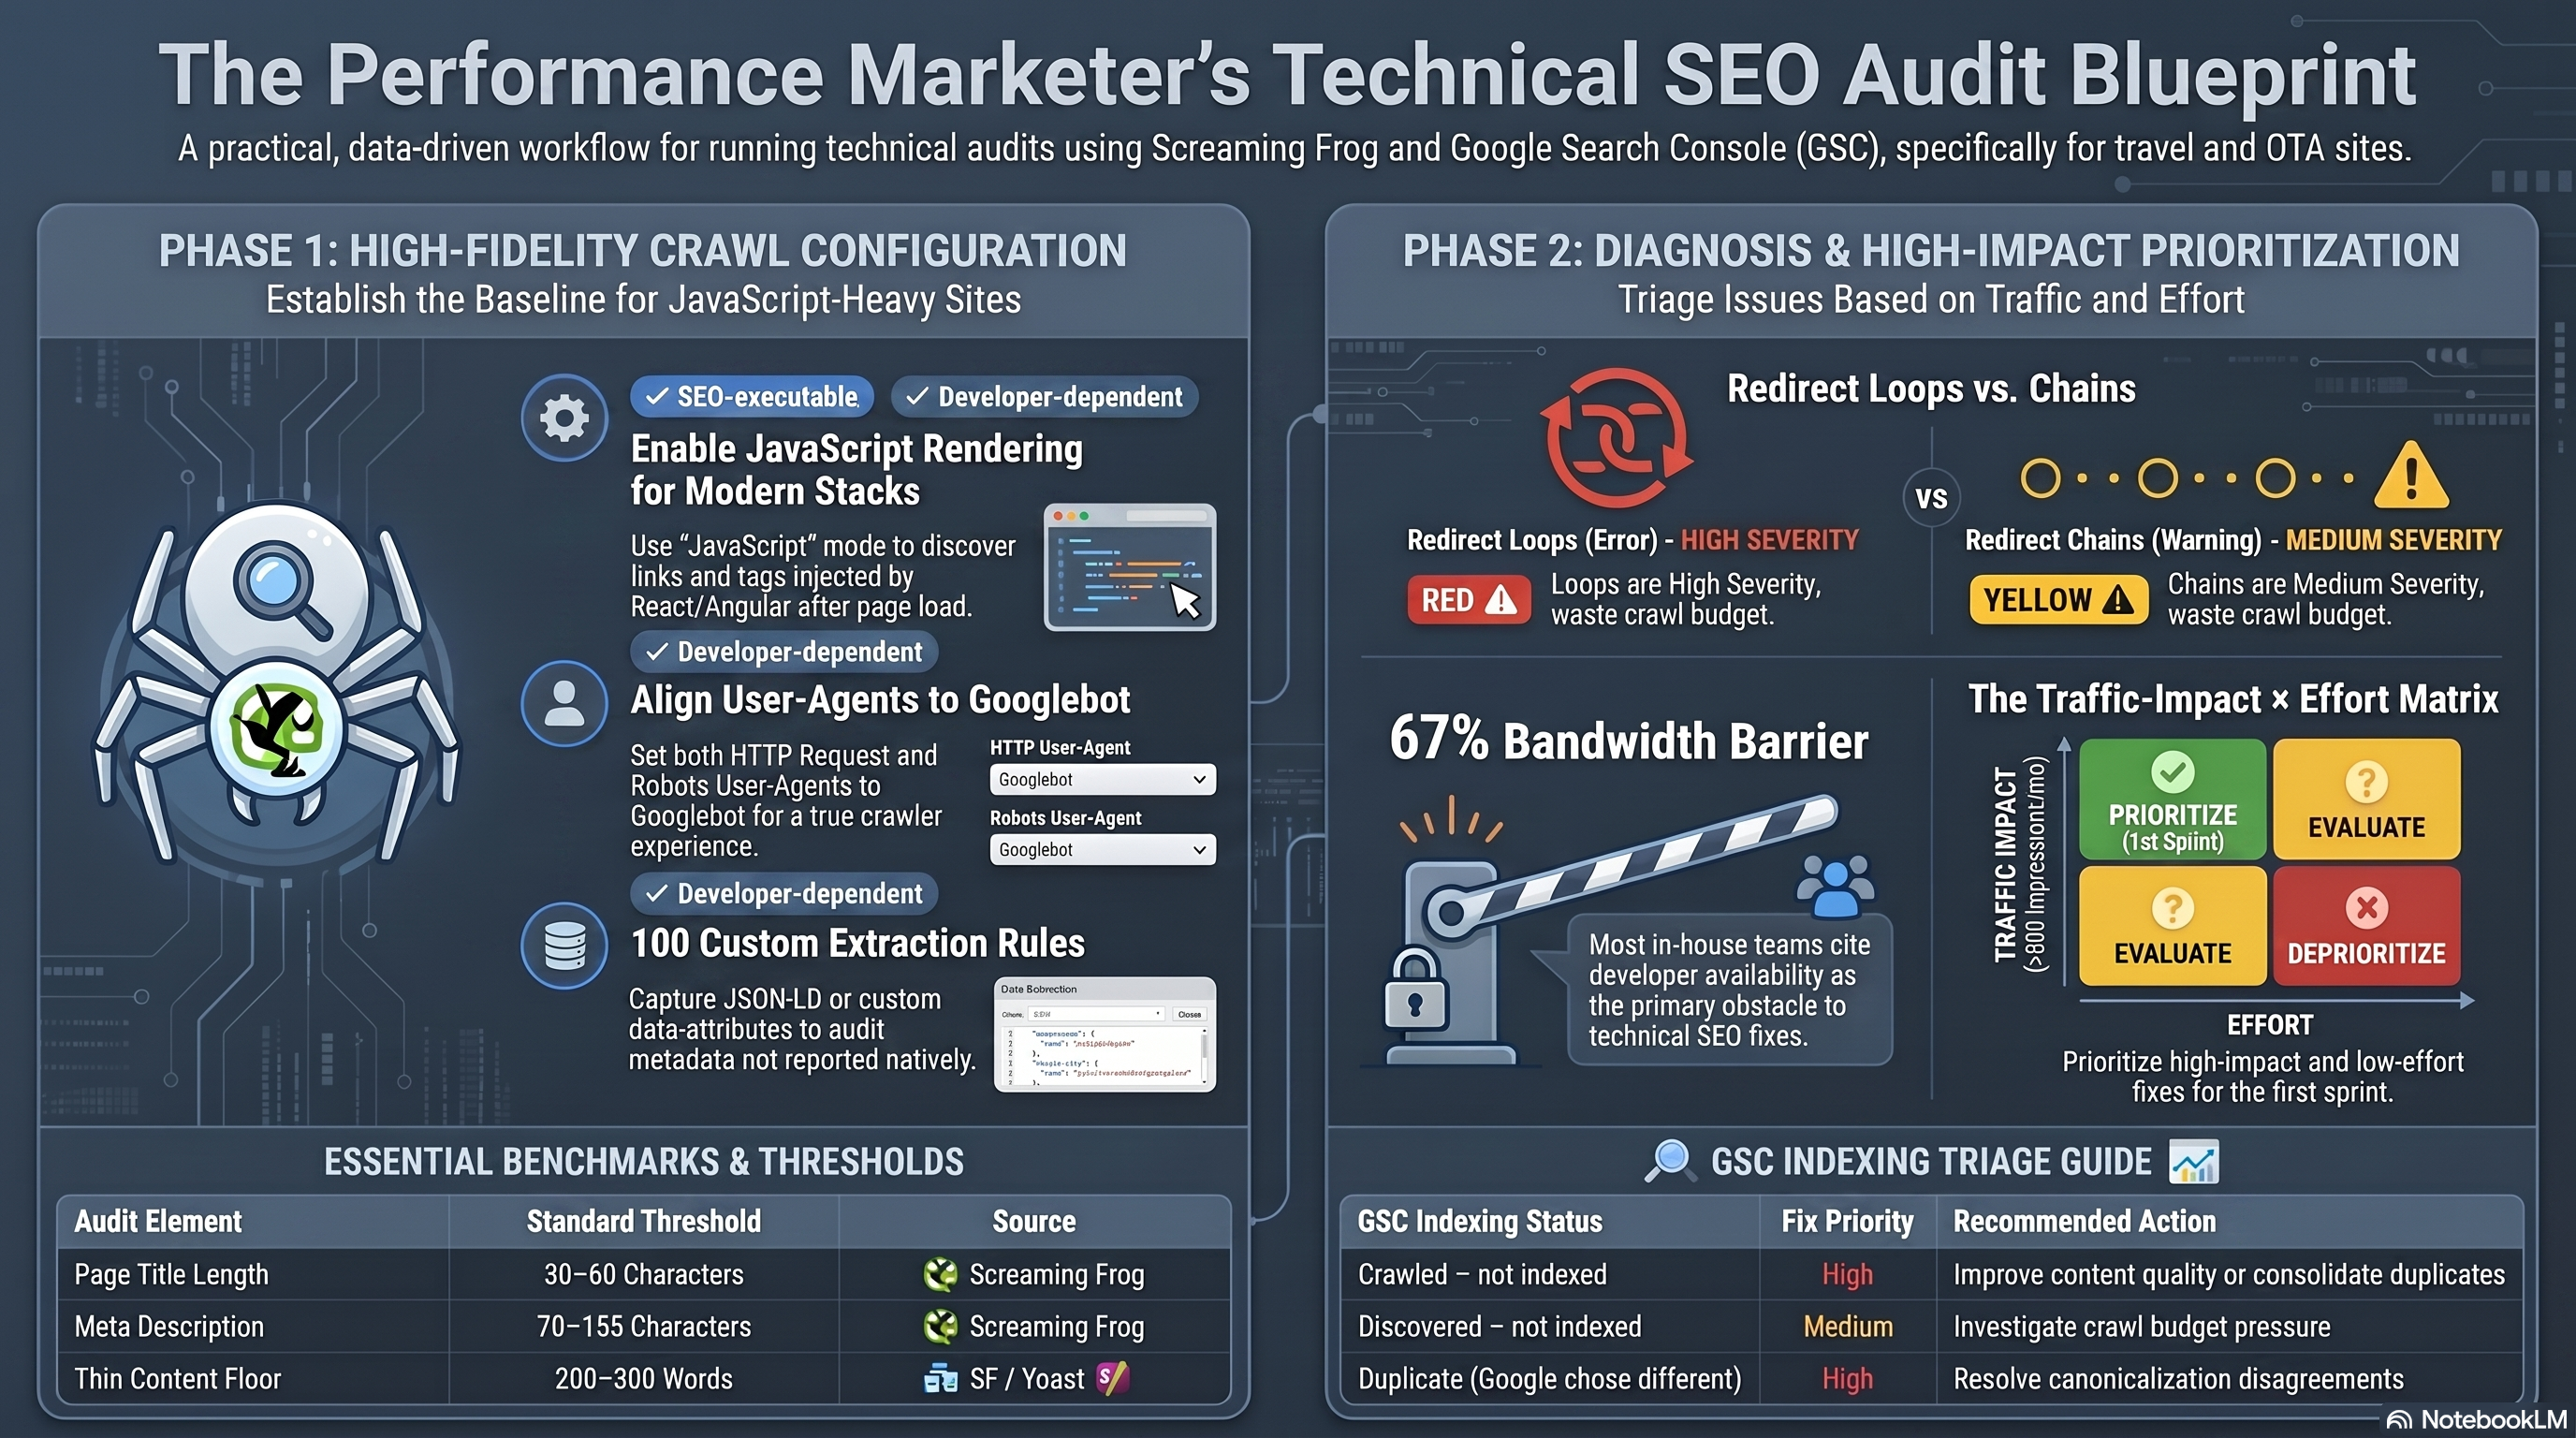
Before Screaming Frog returns a single URL, three configuration decisions determine the quality of everything downstream: render mode, user-agent, and custom extraction.
Render mode lives under Configuration > Spider > Rendering. The default, Text Only, parses raw HTML. On React, Next.js, Angular, or Vue sites, this silently misses links, canonical tags, and structured data injected by JavaScript after page load. Set the mode to JavaScript for any modern frontend — it runs pages through a headless Chromium instance and captures dynamically rendered elements. The Screaming Frog configuration guide defines three rendering options: Text Only, Old AJAX Crawling Scheme (a deprecated Google protocol), and JavaScript. For the vast majority of current-stack sites, the practical choice is Text Only versus JavaScript.
User-agent has two independent settings: the HTTP Request User-Agent (sent in crawl headers) and the Robots User-Agent (governs which robots.txt rules apply). Set both to Googlebot when auditing for organic visibility so directives and crawl-delay settings match what Googlebot actually experiences.
Custom extraction (Configuration > Custom > Extraction) captures values Screaming Frog does not surface natively — JSON-LD text, data-attributes, canonical href values for downstream GSC comparison. Up to 100 XPath, CSS path, or regex extractors run per crawl.
Reading the Issue Export: Redirects, Links, and Duplicates
After a crawl, use Bulk Export > Issues > All for a CSV per issue category. The two highest-value exports for redirect and link diagnosis:
- Reports > All Redirects — each row shows Address, hop count, and a "Redirect Loop" True/False column.
- Bulk Export > Response Codes > 4xx Inlinks — identifies which pages link to broken URLs. Without inlinks, a developer can confirm a 404 exists but cannot locate the source links to update.
Redirect chains and redirect loops appear in the same report but carry different severity and fixes. A redirect chain is two or more sequential hops (A→B→C) that resolves to a final 200 — it costs crawl budget and dilutes link equity, but Googlebot reaches the destination. Screaming Frog flags chains at medium severity (Warning). A redirect loop has "Redirect Loop = True" in the report — the sequence revisits a URL it has already seen and can never resolve to a final destination; Googlebot cannot index the page. Loops are flagged at high severity (Error). According to Screaming Frog's redirect loop documentation, the fix sequence is: resolve the circular reference in server config or CMS, update internal links pointing to the original URL, then implement a direct 301 to the correct final destination. Fix loops before chains.
Duplicate title detection uses the Page Titles tab with the "Duplicate" filter — pages sharing identical title strings appear here along with an Occurrences count. Apply the same filter in the Meta Description tab for duplicate descriptions. Screaming Frog flags titles outside 30–60 characters and meta descriptions outside 70–155 characters under the over/under length filters.
Diagnosing Thin Content and GSC Cross-Reference
Screaming Frog's Low Content Pages filter flags HTML pages below 200 words by default (configurable in the HTML tab). Apply this threshold critically: product pages, booking confirmation pages, and contact pages legitimately have low word counts. For editorial content — destination guides, how-to articles, blog posts — the Yoast SEO thin content guide sets a practitioner floor of 300 words. The fix decision: if a thin page has unique value, expand it with original content; if it substantially duplicates a sibling page, consolidate into one comprehensive page with a 301 redirect from the thinner version.
Cross-referencing with GSC requires connecting the URL Inspection API at Config > API Access > Google Search Console (2,000 URLs/day/property limit). After crawl, the Search Console tab provides the "Indexable URL Not Indexed" filter — URLs that Screaming Frog classifies as crawlable but Google has not indexed.
The GSC Page Indexing report categorizes non-indexed URLs with four primary statuses:
| Status | Fix priority | Action |
|---|---|---|
| Crawled – currently not indexed | High | Improve content quality or consolidate duplicates |
| Discovered – currently not indexed | Medium | Investigate crawl budget; not a content problem |
| Duplicate, Google chose different canonical | High | Resolve the canonicalization disagreement |
| Alternate page with proper canonical tag | None | Expected behavior — no action required |
<Callout type="warning"> "Discovered – currently not indexed" is not an error. Google found the URL but has not yet crawled it — typically a crawl budget issue on large sites, not a content quality failure. Resubmitting via Request Indexing does not accelerate crawling. Crawl budget fundamentals are in 01-crawlability-indexation-fundamentals. </Callout>
Building a Prioritized Fix Backlog
A flat list sorted by Screaming Frog severity is not a fix plan. Use a traffic impact × implementation effort matrix to sequence work: high-impact / low-effort items fill the first sprint; high-impact / high-effort items belong on the roadmap; low-impact items are quick wins or deferred. Score traffic impact from GSC Search Analytics impressions for each affected URL set (>500 impressions/month = High; 50–500 = Medium; <50 = Low). Aira's 2026 State of Technical SEO Report found 67% of in-house SEO teams cite developer bandwidth as their primary barrier — priority order is the only lever the SEO team controls.
Split the backlog into two lanes: SEO-team-executable (meta description updates, internal link corrections, content expansions) and developer-dependent (server-side redirect resolution, template-level duplicate title fixes, JavaScript render configuration). Developer-dependent items require clear acceptance criteria; the format for writing those tickets is covered in 06-developer-collaboration-seo-change-management.
Hands-On Exercise: Audit a 500-URL Site Segment
Time: 15–20 minutes | Tools: Screaming Frog free tier (500-URL limit)
- Launch Screaming Frog. Under Configuration > Spider > Rendering, select Text Only. Enter a site URL you own or manage and start the crawl.
- When complete, open the Issues tab. Screenshot the top three issues by severity.
- Navigate to Reports > All Redirects. In the exported CSV, identify any rows where "Redirect Loop" = True. Note the Address and find its inlink sources via Bulk Export > Response Codes > 3xx Inlinks.
- Apply Page Titles > Duplicate filter. Record the count and note which URL pattern repeats most.
- Apply HTML > Low Content Pages filter. Identify three flagged URLs and classify each: editorial page needing expansion, structural page with legitimately low content, or duplicate candidate for consolidation.
- If you have GSC access, connect the URL Inspection API under Config > API Access. Re-crawl and apply "Indexable URL Not Indexed" in the Search Console tab.
Success criteria: You have an Issues tab screenshot, a list of redirect loops (or a confirmed zero-loop result), a duplicate title count, and a three-row thin-content classification table with a recommended action — expand, consolidate, or no action — for each flagged URL.
Next: 03-core-web-vitals-performance — measuring LCP, INP, and CLS with PageSpeed Insights and CrUX.
Core Web Vitals & Page Performance Optimization
The Three Core Web Vitals in 2026
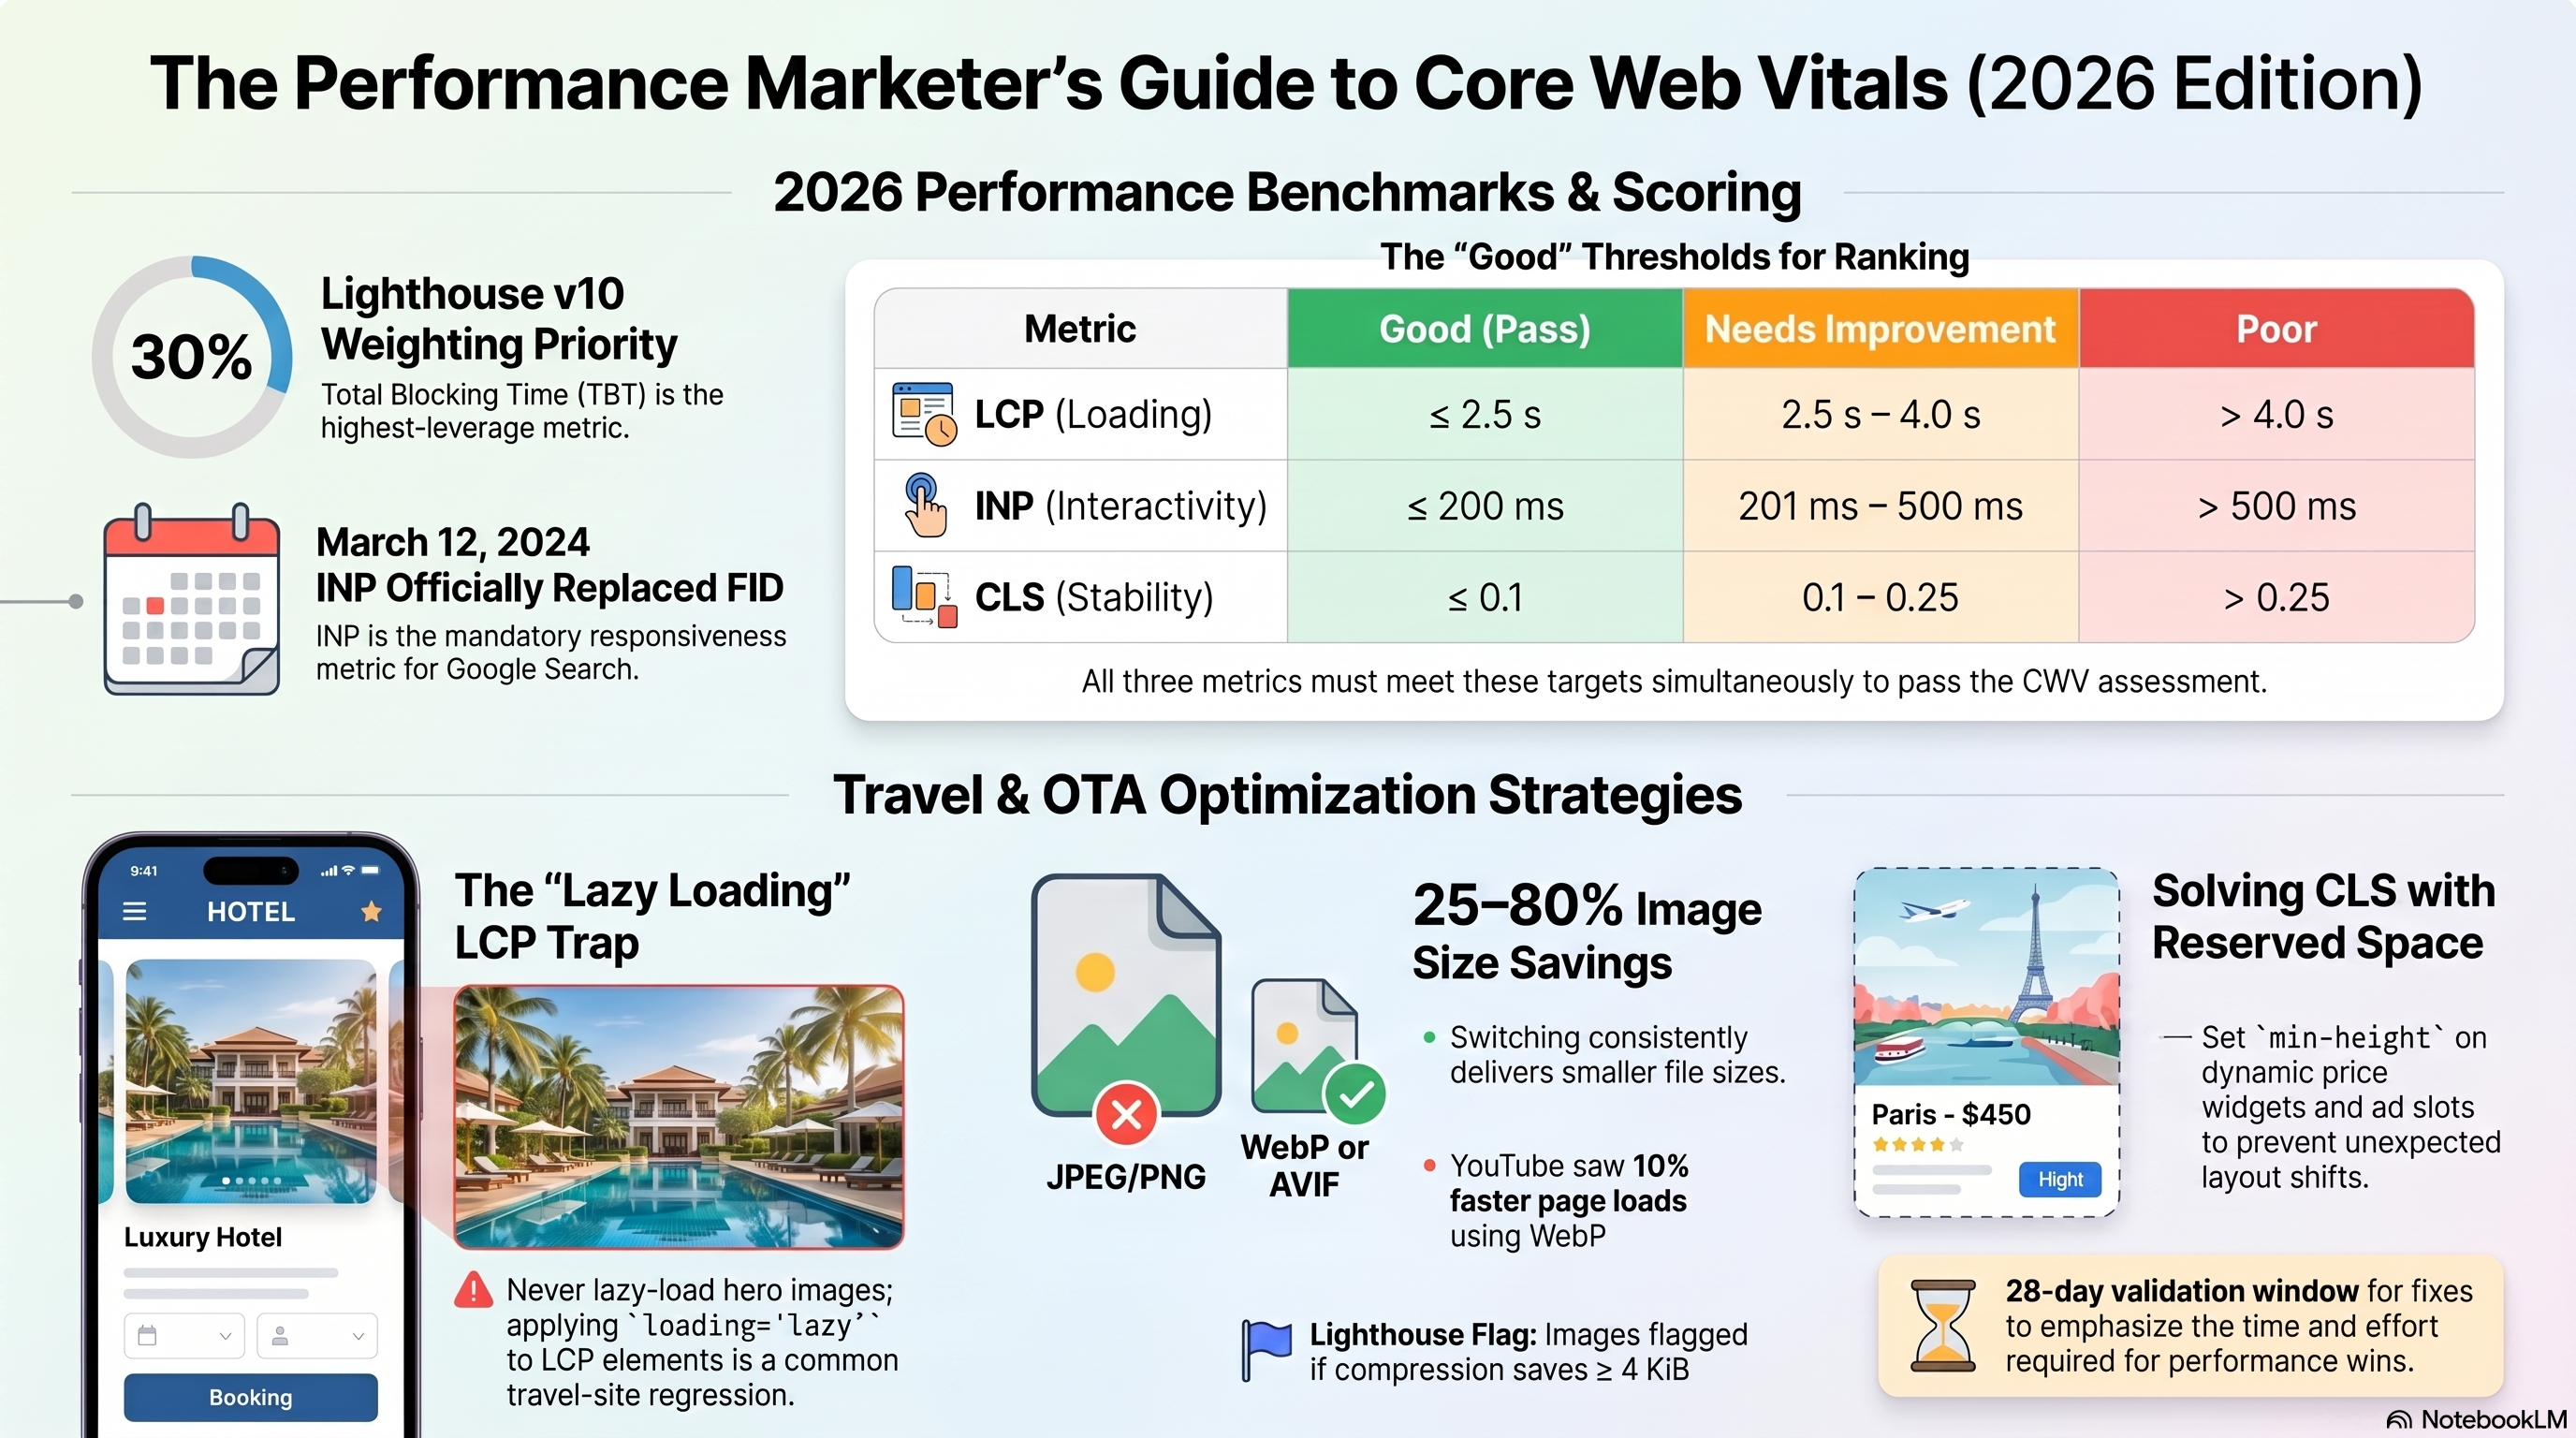
Google's Core Web Vitals are three field-measured signals used to assess page experience: Largest Contentful Paint (LCP) for loading speed, Interaction to Next Paint (INP) for responsiveness, and Cumulative Layout Shift (CLS) for visual stability. A page passes CWV assessment only when all three reach Good simultaneously. All three are measured at the 75th percentile of CrUX field data, segmented by mobile and desktop. Web Vitals — web.dev
| Metric | Good | Needs Improvement | Poor |
|---|---|---|---|
| LCP | ≤ 2.5 s | 2.5 – 4.0 s | > 4.0 s |
| INP | ≤ 200 ms | 201 – 500 ms | > 500 ms |
| CLS | ≤ 0.1 | 0.1 – 0.25 | > 0.25 |
Partial compliance earns no ranking benefit.
INP vs FID: Why the Metric Changed
First Input Delay (FID) measured only the browser's queue delay before beginning to process the very first user interaction on a page. It ignored what happened after processing started, and it never recorded any interaction after the first one. A single click that opened a dropdown fast would produce a Good FID score even if every subsequent date-picker selection stalled the main thread for 600 ms.
Interaction to Next Paint (INP), which officially replaced FID on March 12, 2024, closes these gaps. INP observes every click, tap, and keyboard input across the page's full lifetime and reports the worst full-latency interaction—covering input delay, main-thread processing time, and the delay until the next visible frame is presented. INP becomes a Core Web Vital
PageSpeed Insights: Lab vs Field Data
Run PageSpeed Insights for any URL and you'll see two distinct sections. Field data (top) pulls from CrUX—28 rolling days of real Chrome user measurements at the 75th percentile. Lab data (below) is a Lighthouse simulation on a throttled mid-tier Moto G4 device. Lab data is reproducible and debuggable; field data reflects real device and network diversity. PageSpeed Insights API
The two sections frequently disagree. Lab LCP might show 2.3 s (Good) while field LCP shows 4.1 s (Poor) because real users have slower devices and active background tabs. Always prioritize field data findings—they're what affects ranking. Use lab data to root-cause issues and measure whether a specific fix moved the needle.
<Callout type="warning"> Never declare a CWV fix "done" after a Lighthouse improvement alone. CrUX is a 28-day rolling dataset; a fix deployed today will not fully register in field data for approximately four weeks. Confirm lab improvement first, then monitor GSC's Core Web Vitals report for the full 28-day validation window before closing the ticket. </Callout>
The Chrome DevTools Lighthouse panel gives you the same lab simulation locally. In the Performance tab, the Opportunities section lists actionable optimizations; Diagnostics lists contributing factors that do not directly affect the score. The Lighthouse score weights Total Blocking Time at 30%, LCP and CLS at 25% each—so reducing main-thread blocking is the highest-leverage route to a higher score.
Fixing Render-Blocking Scripts
Lighthouse flags render-blocking resources under Opportunities. Three patterns cause blocking: a <script> in <head> without defer or async; a <link rel="stylesheet"> without a media attribute matching the current render context (for example, a print stylesheet missing media="print"); and inline scripts calling document.write(), which forces the parser to stop and re-execute. Eliminate Render-Blocking Resources
Use async for independent third-party scripts—analytics beacons, review widgets, chat tools—where execution order doesn't matter. Use defer for scripts that depend on other scripts or need the full DOM. The choice matters: async on a jQuery-dependent script will break the page if jQuery loads after it. A print stylesheet becomes non-blocking with one attribute: media="print".
Oversized Images and Lazy Loading
Lighthouse flags images as optimizable when recompression would save ≥4 KiB. Converting JPEG hero images to WebP reduces file size by 25–35%; AVIF compresses further and is supported in Chrome 85+, Firefox 93+, and Safari 16+. Serve both formats using a <picture> element—AVIF as the first <source>, WebP second, JPEG as the <img> fallback—so browsers select the best format they support. Use WebP Images — web.dev
Apply loading="lazy" to every below-the-fold image and iframe to defer their network requests. Never lazy-load the LCP element. Adding loading="lazy" to the hero hotel photo on a travel detail page defers its load until the user scrolls near it—guaranteeing a Poor LCP. Use loading="eager" plus fetchpriority="high" on the LCP image instead. Always include explicit width and height attributes: without them, the browser cannot reserve space before the image loads and surrounding content shifts—a direct CLS contribution. Browser-level image lazy loading — web.dev
Layout Shift: Finding and Fixing the Culprit
CLS accumulates from every unexpected shift during the page's lifetime. The three most common culprits on travel and e-commerce pages are: ad slots without reserved height (third-party ad containers that expand after initial paint); web font swaps (the custom font loads and displaces the fallback due to different metrics—use font-display: optional or size-adjust to eliminate the shift); and images without explicit dimensions (covered above).
To find the source: enable "Layout Shift Regions" in Chrome DevTools → Settings → More Tools → Rendering. Purple overlays flash on shifting elements during page load. The Performance panel's Layout Shifts track shows each event with a source element and its movement distance, letting you precisely identify the responsible DOM node. Debug Layout Shifts
Writing a Developer Performance Brief
A performance brief translates your CWV findings into work a developer can execute without asking clarifying questions. Include: the metric and its current value; the diagnosed root cause with evidence (tool used, screenshot or network waterfall); the specific code change required including file path; and acceptance criteria using both lab and field thresholds. Without acceptance criteria, a developer might close the ticket after a Lighthouse improvement that leaves the field CrUX unchanged.
Example acceptance criteria: Lab LCP < 2.5 s on Lighthouse mobile; CrUX LCP reaches Good band in GSC Core Web Vitals report after 28-day validation; CLS does not increase above 0.1. Include an explicit "Out of Scope" section—ambiguity becomes implicit permission to touch adjacent code.
Before/After CrUX Validation in GSC
After deploying a fix, open the Core Web Vitals report in Google Search Console, navigate to the affected URL group, and click "Start Tracking" to begin a 28-day validation window. Core Web Vitals report in Search Console CrUX is a rolling 28-day dataset, so a fix deployed today will not fully register for approximately four weeks. Confirm lab LCP improves first—if lab is unchanged, field won't improve. Then monitor GSC weekly for regressions during the window.
Hands-On Exercise: Audit a Page in 20 Minutes
Use PageSpeed Insights and Chrome DevTools to audit one live URL.
Steps: 1. Run PageSpeed Insights. Record field values for LCP, INP, and CLS; note which are Good, Needs Improvement, or Poor. 2. In the lab section, open Opportunities. List every render-blocking resource Lighthouse identifies. 3. Open Chrome DevTools → Lighthouse → run Mobile audit → identify which of the five scored metrics (TBT, LCP, CLS, FCP, SI) is dragging the score lowest. 4. Enable "Layout Shift Regions" (Rendering panel). Reload the page. Note any purple overlays and their source elements. 5. Write a developer performance brief for the single highest-priority finding: current metric value, root cause, required code change, and acceptance criteria.
Success criteria: Brief includes a quantified current value, a specific element or attribute to change, and both a lab and a field acceptance criterion.
Next chapter: 04-on-page-optimization-structured-data covers title tags, JSON-LD schema, and internal linking—the on-page signals that work alongside your CWV improvements.
On-Page Optimization & Structured Data Implementation
Title Tags, H1, and Meta Descriptions
The three most-audited on-page elements are also the most commonly misimplemented.
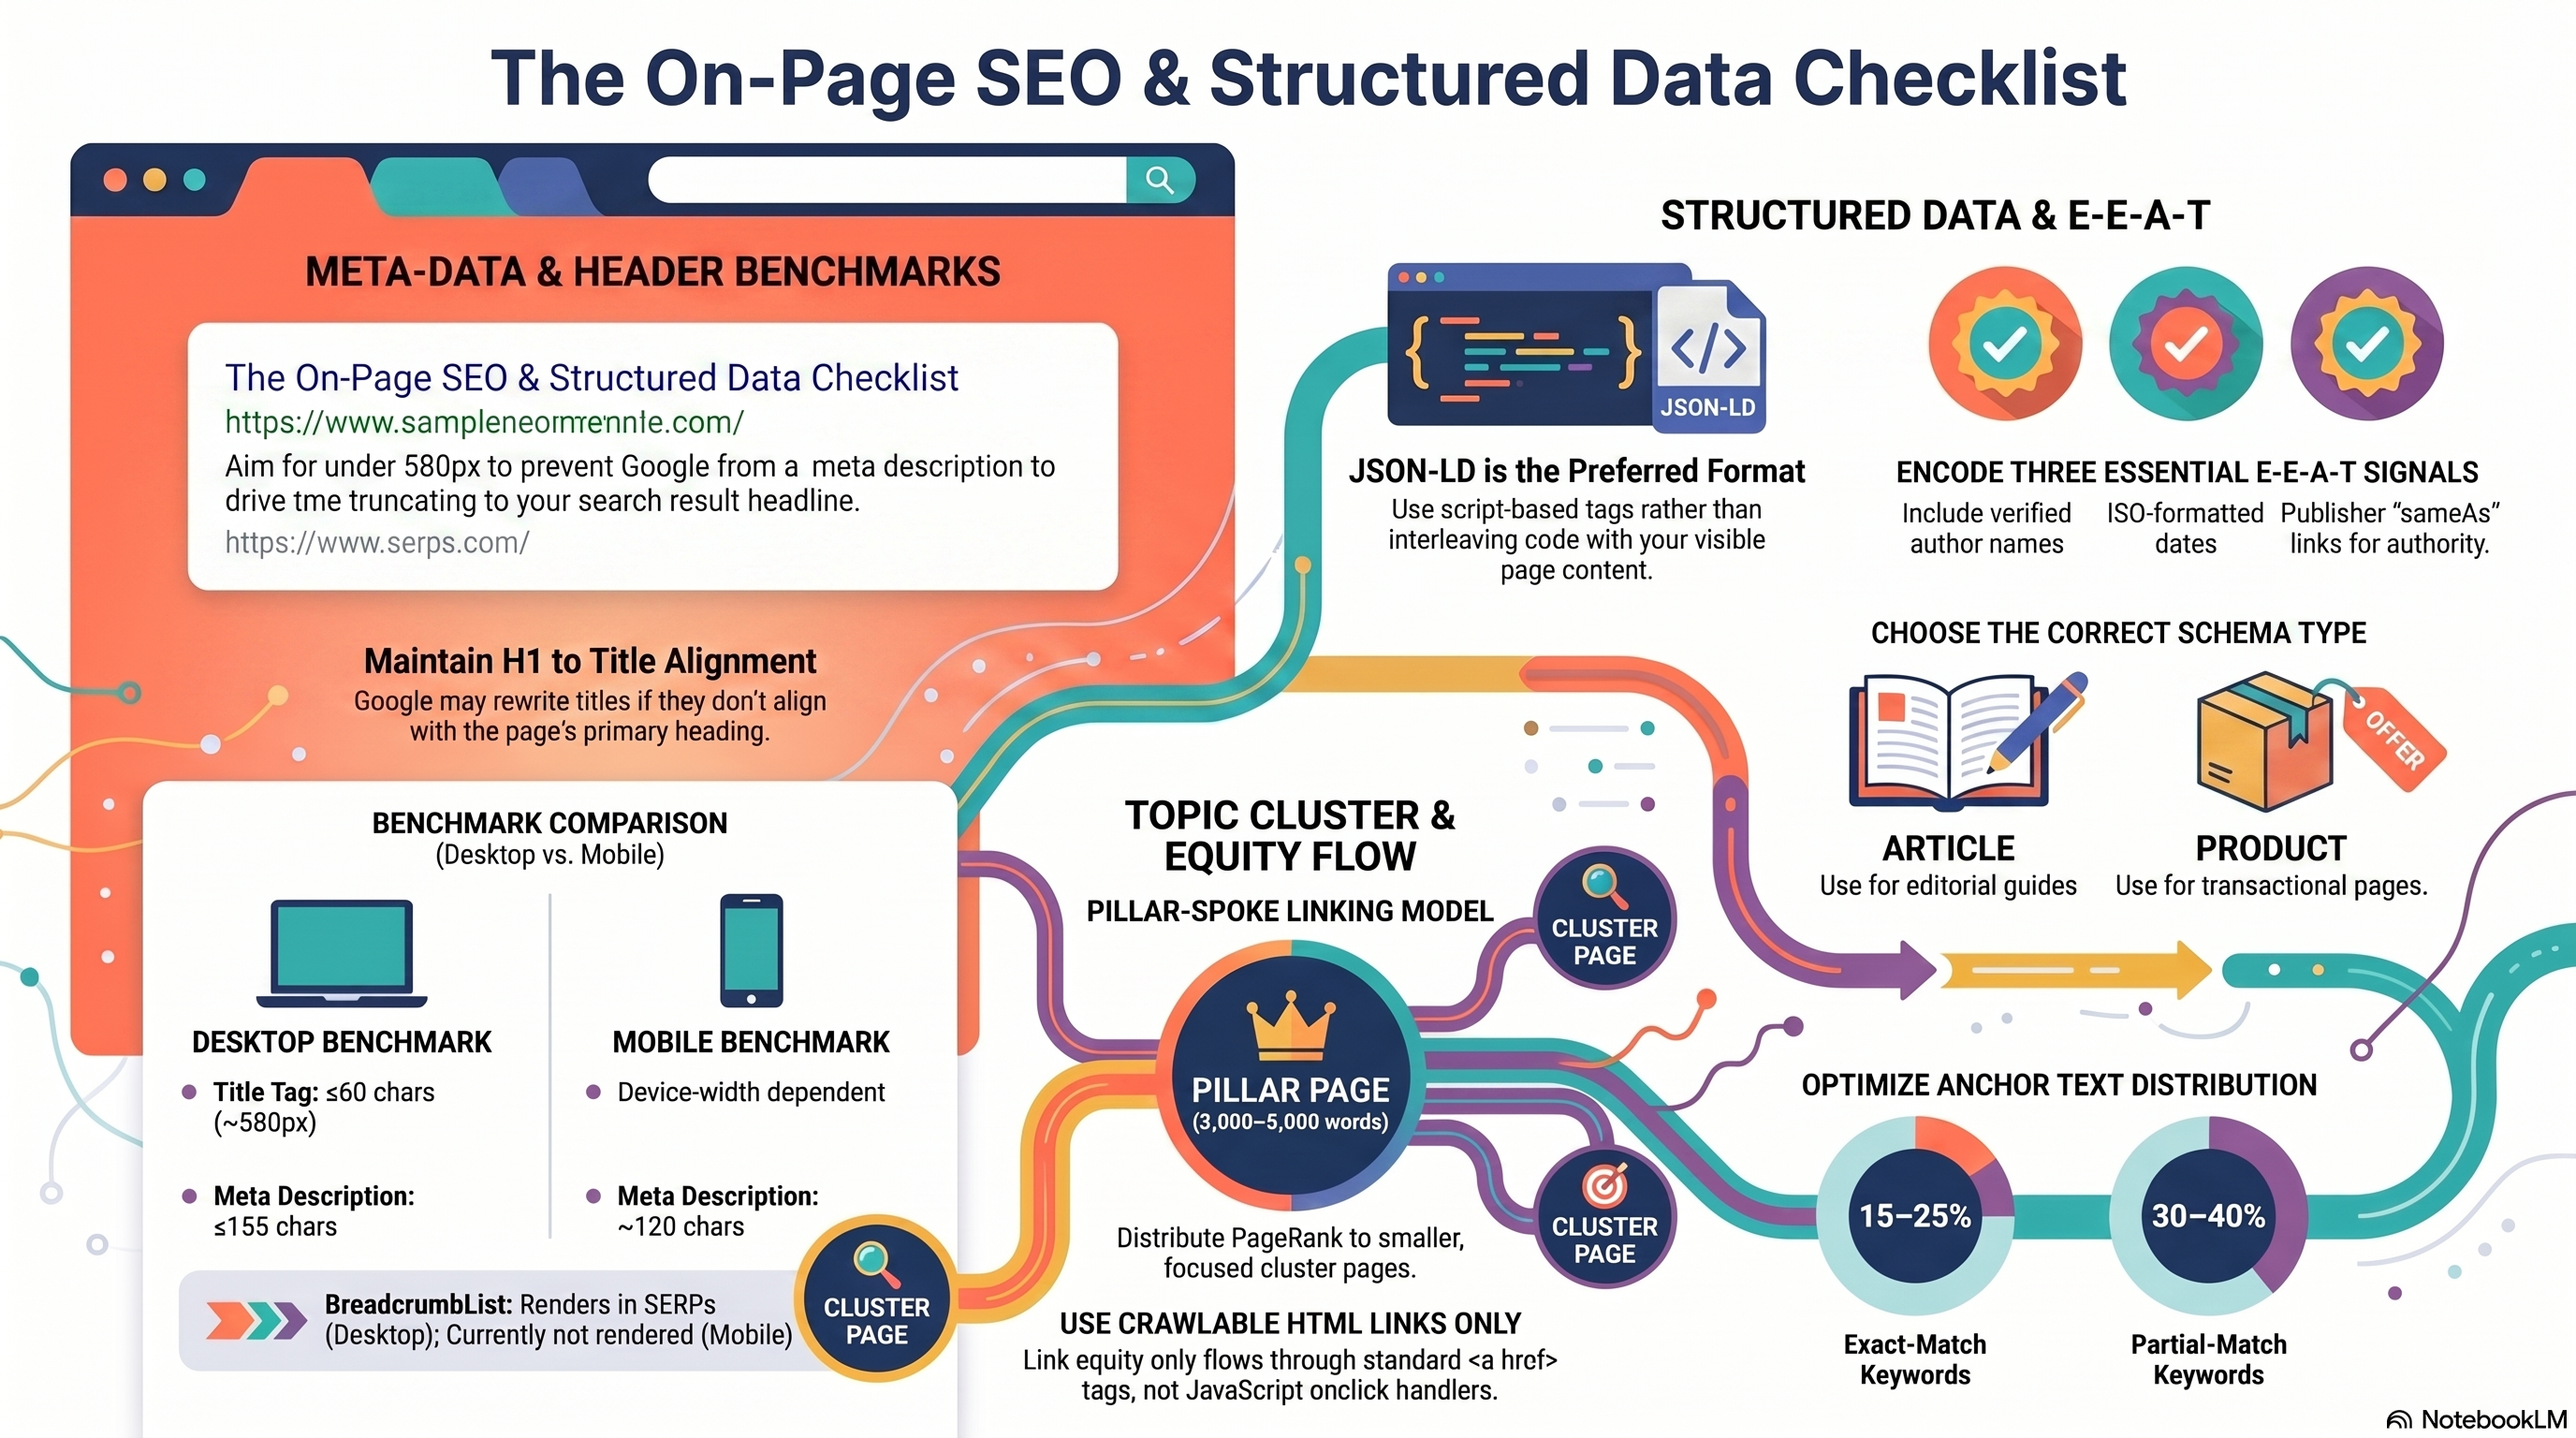
Title tags. Google does not publish a fixed character limit. What it specifies: titles are "truncated as needed to fit the device width." The industry-accepted guideline is ≤60 characters (≈580px on desktop), derived from observing where truncation most reliably kicks in. Exceed that limit and Google clips your title mid-keyword. More damaging: if Google determines your title is boilerplate, keyword-stuffed, or missing, it rewrites it automatically — drawing from your <h1>, og:title, or the largest visible text on the page. Control your title links in search results
This is why H1 alignment is not optional. One H1 per page is the rule — multiple competing H1s cause Google to pick the first and ignore the rest. The <title> and <h1> should target the same primary keyword but not be identical. A reliable formula for destination guides: [Primary Keyword] — [Value Prop] | [Brand] — for example, Bali Travel Guide 2026 — Hotels, Flights & Itineraries | TravelDesk.
Meta descriptions. No enforced limit here either. The practitioner cap is ≤155 characters for desktop (≈120 for mobile) before soft-wrap truncation appears in SERPs. Meta descriptions are not a ranking signal, but they are a click-through-rate lever — frame them as a value proposition, not a keyword list. Google may bypass your description entirely and generate its own snippet from page content when it judges that more useful. Control your snippets in search results
JSON-LD Structured Data: Article, Product, and BreadcrumbList
JSON-LD is Google's preferred structured-data format — a <script type="application/ld+json"> tag that doesn't interleave with visible content and can be dynamically injected. Choose your schema type based on the page's primary purpose.
Article (@type: Article or BlogPosting): For editorial content. A Bali destination guide is an article. No fields are technically required, but include headline, author, datePublished, dateModified, and image at 16:9, 4:3, and 1:1 aspect ratios for maximum rich-result eligibility. Article structured data
Product (@type: Product): For transactional pages. A bookable Delhi-to-Bali round-trip flight is a product. Add an Offer node with price, priceCurrency, and availability — this unlocks Product Snippets (price and availability displayed directly in SERPs). Use validThrough to prevent stale pricing data in Google's cache. Product structured data
BreadcrumbList: Encodes a page's position in the site hierarchy as an ordered list of ListItem entries. Requires at minimum two items; the final breadcrumb omits the item URL (it represents the current page). Note: BreadcrumbList rich results currently render on desktop only — do not expect mobile breadcrumb paths. Breadcrumb structured data
Validating Schema: Rich Results Test and Schema.org Validator
Two separate tools serve different purposes — using only one is a common mistake.
Google Rich Results Test (search.google.com/test/rich-results): Tests whether Google can generate a rich result from your markup. Accepts a live URL or pasted JSON-LD. Returns detected schema types, errors, and warnings. This is the final arbiter for rich-result eligibility.
Schema Markup Validator (validator.schema.org): Tests syntactic Schema.org compliance. A schema can pass here and still be ineligible for rich results if it violates Google's additional requirements — missing recommended properties, spam policy, or eligibility criteria specific to the rich result type. Run both.
Workflow: write JSON-LD → validate syntax on validator.schema.org → test rich-result eligibility on the Rich Results Test → fix all flagged errors → re-test with the live URL after deployment.
<Callout type="warning"> A schema that passes validator.schema.org is syntactically valid — not rich-result eligible. Only the Google Rich Results Test confirms Google-specific eligibility. Run both tools before closing any structured-data implementation ticket. </Callout>
For how to write structured-data implementation tickets and hand them off to engineering, see Chapter 6: Developer Collaboration & SEO Change Management.
E-E-A-T Signals in Structured Data
There is no @type: EEATSignal in Schema.org. E-E-A-T (Experience, Expertise, Authoritativeness, Trustworthiness) is inferred from a combination of markup properties, not from a single schema type. Creating helpful, reliable, people-first content
Three encodable signals in Article schema:
1. Author identity + biography URL. author.name must contain only the author's name — never "TravelDesk Staff" or any publisher label. Pair it with author.url pointing to a bio page with verifiable credentials, or add sameAs linking to a professional profile. Use @type: Person for individuals, @type: Organization for entity authors. This encodes Experience and Expertise.
2. `datePublished` and `dateModified`. Must use ISO 8601 format (2026-06-10T09:00:00+05:30). These signal editorial freshness to Google. Omitting dateModified when refreshing evergreen content leaves the page appearing stale in both Google's systems and the displayed search snippet date — a common oversight with real ranking consequences.
3. `publisher.sameAs`. Links the publishing Organization node to a recognized entity: Wikipedia, Wikidata, or the official homepage. Helps Google disambiguate your brand in the Knowledge Graph. This signals Authoritativeness of the publishing organization.
Topic-Cluster Internal Linking
The pillar-spoke model is the on-page mechanism by which link equity circulates within a topic cluster.
Pillar page: A comprehensive, long-form page (2,000–5,000+ words) covering a broad topic. It typically accumulates the most external backlinks in a cluster. Every crawlable <a href> link from the pillar to a spoke page passes a fraction of the pillar's PageRank to that spoke. Internal Linking Strategy & Topical Authority Playbook 2026
Cluster (spoke) pages: Focused pages on sub-topics. Each must link back to the pillar using anchor text containing the pillar's target keyword — reinforcing the pillar's topical authority signal. Equity flows bidirectionally: external links enter through the pillar, distribute outward to spokes; spoke-to-pillar return links amplify the pillar's standing.
The entire model depends on crawlable <a href="..."> anchor elements. JavaScript-only navigation (onclick handlers, href="#" with JS routing) does not reliably transfer PageRank — Google states it can "only reliably crawl" standard HTML anchor elements.
Anchor text selection: Use descriptive phrases that tell Google what the destination page covers. Avoid "click here" or "read more." Vary anchor text across exact-match, partial-match, and semantic phrase variants — avoid over-indexing on any single type. Target 3–5 contextual internal links per article.
The crawl-side audit for discovering which pages have zero inbound internal links is covered in Chapter 1: Crawlability, Indexation & Site Architecture Fundamentals.
Hands-On Exercise: On-Page SEO Audit for a Travel Page
Time: 15–20 min | Free tools: Google Search Console, Rich Results Test, Schema.org Validator
Pick one destination guide URL from a site you have GSC access to.
- Title audit. Copy the
<title>content and count characters. If it exceeds 60, rewrite using the formula[Keyword] — [Value Prop] | [Brand]. In GSC → URL Inspection, confirm Google is displaying your title, not a rewrite.
- H1 check. View source or use DevTools. Verify exactly one
<h1>targets the same primary keyword as the title.
- Meta description review. Check character count (target ≤155 characters). Rewrite if it reads as a keyword list rather than a user benefit.
- Article JSON-LD. Confirm the page has
headline,author(withname+url),datePublished,dateModified, andimage(three aspect ratios if possible).
- Validate. Paste JSON-LD into
validator.schema.org— fix any errors. Then test the live URL onsearch.google.com/test/rich-results— confirm Article detection with no errors or warnings.
Success criteria: Title ≤60 characters with H1 alignment confirmed; Article JSON-LD passes both validators with no errors; meta description ≤155 characters framed as a user benefit.
Next chapter: backlink profile auditing, disavow file construction, and link-earning campaign planning → Chapter 5: Link Strategy: Earning, Auditing & Disavowing Backlinks
Link Strategy: Earning, Auditing & Disavowing Backlinks
Links from authoritative, relevant sites remain one of Google's strongest ranking signals. An unmanaged backlink profile — spammy referring domains, keyword-stuffed anchors, unexplained velocity spikes — can suppress rankings as effectively as broken crawl paths. This chapter covers the full external-link lifecycle: profiling what you have, auditing for risk, disavowing confirmed spam, and earning quality links through competitor analysis and digital PR.
Exporting Your Backlink Profile
Start in Ahrefs Site Explorer: open the Referring Domains report, filter to dofollow links, and export as CSV. Pull the Anchors report as a second export. These two files — who links to you and with what text — are the foundation for every decision in this chapter.
SEMrush Backlink Audit adds a machine-learning layer. It scores each backlink on a 0–100 Toxicity Score across 45+ markers and classifies your portfolio as High (>10% toxic), Medium (3–9%), or Low (<3%). Treat the classification as a triage filter, not a verdict — every flagged domain still requires manual review before any disavow action.
Spam Score and Quality Proxies
No third-party spam score is a Google signal. Ahrefs states explicitly that "toxic backlinks" is a tool-invented label, not a Google concept, and that John Mueller "has no notion" of toxic links. Moz Spam Score (0–100%) uses 27 machine-learned signals to evaluate the linking domain's characteristics — it does not represent how Google treats that link. Domain Rating and Domain Authority are useful quality proxies during manual triage, but a low-DR domain is a candidate for investigation, not automatic disavowal.
Anchor Text Over-Optimization
A natural profile benchmarks at 30–50% branded, 15–25% partial-match keyword, 10–20% generic, 5–15% naked URL, and 1–5% exact-match keyword. Exact-match above 10% crosses into the over-optimization zone associated with Penguin-era algorithmic scrutiny.
The fix is dilution, not disavowal: for the next three to six months, specify branded or partial-match anchors in every outreach request. If a site has accumulated 14% exact-match anchors on phrases like "cheap vietnam tours," future outreach must request "TigerTrails" or "Southeast Asia tour operators" until the ratio normalizes. Recovery from documented over-optimization typically takes around 60 days once the anchor ratio starts improving.
Link Velocity Anomalies
Link velocity is the rate at which new referring domains arrive each month. Google's SpamBrain analyzes billions of links daily; a monthly count exceeding 2× the site's historical median raises the probability of algorithmic review.
In Ahrefs, the Referring Domains graph is your primary detector. Filter to New referring domains over the spike's date range, sort by DR ascending, and check the Anchors report for the same window. A spam or PBN attack shows low-DR domains sharing identical exact-match anchors in c-class IP clusters. A PR campaign shows editorial sites with organic traffic. The diagnostic difference matters: a spam spike may warrant disavowal; a PR spike warrants documentation. Record all confirmed campaign dates in your rationale log — a future auditor cannot distinguish earned velocity from an attack without it.
The Disavow File: Format, Submission, and Rationale
A disavow file is a plain-text .txt file (UTF-8 or 7-bit ASCII, max 2 MB / 100,000 lines) submitted via the Google Search Console Disavow Links tool. Three constructs cover all cases:
domain:spammydomain.com— disavows the root domain and all subdomains. Use for confirmed PBNs and spam networks.- A bare URL — disavows that single page only. A sitewide PBN needs a domain entry, not one URL entry per page.
- Lines starting with
#— comments ignored by Google; use them for inline rationale documentation.
<Callout type="warning"> Each GSC upload replaces the previous file entirely. A site that previously disavowed 150 domains and uploads a new 5-domain file silently re-enables the 145 domains absent from the new file. Always download the existing disavow file, merge new entries, then upload the combined version. </Callout>
Google recommends disavowal only for confirmed manual actions or large volumes of manipulative links — not for tool-assigned toxicity scores alone. For every disavowed domain, maintain a rationale spreadsheet: domain, DR, link type, risk signal, outreach attempt date and outcome, decision date, and auditor. This record is required evidence for any reconsideration request.
Finding Link-Earning Opportunities
The highest-conversion prospecting method is a competitor backlink gap analysis. SEMrush Backlink Gap and Ahrefs Link Intersect surface domains linking to competitors but not you. The "Best" category in SEMrush — domains that link to all selected competitors — is your highest-priority prospect list; editorial willingness in the niche is already proven. Run this before any cold outreach.
Resource page prospecting is the second channel: search intitle:"resources" "southeast asia travel" to surface curated link pages, then pitch with a specific asset that earns inclusion. Conversion exceeds cold outreach because the curator has already opted into linking behavior.
Travel and OTA-Specific Channels
Two channels are uniquely accessible to travel brands:
Tourism board resource pages — Organizations like the Tourism Authority of Thailand or Vietnam National Administration of Tourism maintain "where to book" pages with DR typically between 50 and 80. The pitch is credentialing: licensed operator status, authenticated guide network, or regulatory certification.
Destination guide features in travel media — Lonely Planet, Condé Nast Traveler, and BBC Travel run "best operators" sections. The winning pitch is original data — a three-year weather analysis, a visa-free travel matrix — or exclusive photography. Product descriptions do not earn editorial placements.
Outreach Template Structure
Every email must clear four tests: (1) Reference a specific recent article — proof you read the publication. (2) Offer something concrete: an exclusive data excerpt or a resource their audience would bookmark. (3) State relevance in one sentence. (4) Make one ask — an addition to an existing article or consideration for a future piece.
Never use the word "backlink." Never request an exact-match anchor. Cision's 2025 data shows 98% of journalists reject pitches over 400 words and 86% immediately discard off-beat pitches.
90-Day Link Acquisition Campaign
Structure outreach against three target tiers:
| Tier | DR Range | Count | Site Types |
|---|---|---|---|
| 1 | > 50 | 10 | Tourism boards, major travel publishers, .edu |
| 2 | 30–50 | 30 | Destination guides, travel blogs, niche PR outlets |
| 3 | 15–30 | 20 | Regional communities, hospitality blogs |
Days 1–14: Run Backlink Gap against three competitors; commission a linkable asset (original survey or evergreen resource page). Days 15–60: Tier 1 outreach first; Tier 2 blogger and resource page outreach in parallel with the .edu scholarship announcement. Days 61–90: One follow-up per non-respondent; re-audit anchor ratios; report new RD count, DR distribution, and velocity chart.
Hands-On Exercise: Anchor Text Audit (15–20 Minutes)
Using Ahrefs (free account or 7-day trial):
- Site Explorer → enter your domain → click Anchors → sort by Referring Domains descending → export CSV.
- In a spreadsheet, categorize each anchor row: branded, exact-match, partial-match, generic, or naked URL.
- Calculate each category's percentage share of total referring domains.
- Compare your exact-match percentage against the 1–5% safe ceiling and the 10% danger threshold.
- List the top three exact-match anchor strings with their top-linking domain DRs.
Success criteria: You can state whether your exact-match ratio is inside or outside the safe ceiling and name one dilution action — a specific anchor text to request in future outreach.
06-developer-collaboration-seo-change-management — Developer Collaboration & SEO Change Management — translates every finding from this course into sprint-ready developer tickets and manages the change process through to post-launch monitoring.
Developer Collaboration & SEO Change Management
Writing Developer-Ready SEO Tickets
An audit finding stays theoretical until a developer understands exactly what to build and how to verify it's done. A developer-ready SEO ticket requires three elements: a problem description with example URLs, testable acceptance criteria, and an impact statement linking the fix to a search performance or business outcome.
Each element does distinct work. The problem description anchors the fix to real URLs so there's no ambiguity about scope. The acceptance criteria eliminate interpretation — they specify the exact HTTP status code, HTML attribute, or rendered output that constitutes a passing implementation. The impact statement answers the question every sprint lead asks: "Why this sprint?" Connecting a 302 redirect to a months-long ranking recovery timeline is more persuasive than citing best practices. How to Write Engineering Tickets for SEO Work – Gray Dot Co
Two rules tighten every SEO ticket. First, specify what, not how: define the required outcome and let developers pick the implementation that fits their stack. Prescribing a code snippet to a team using a different framework guarantees pushback and re-work. Second, one issue per ticket — combining multiple SEO problems makes effort estimation, QA, and rollback impossible to scope. Writing an Effective SEO Development Ticket – Edwin Romero
Before writing any ticket, decide whether engineering access is actually required. Developer-dependent tasks require changes to server configuration, CMS templates, JavaScript, or database-driven output. SEO-team-executable tasks live in GSC settings, CMS fields, or third-party tools. Only developer-dependent work goes to the sprint backlog — mixing the two inflates scope estimates and wastes planning time.
Pre-Launch Migration SEO Checklist
Site migrations are the highest-risk SEO events in a deployment calendar. Sequence matters as much as the steps themselves.
Two to four weeks before launch: Verify both the old and new domain properties in Google Search Console. The Change of Address form — required for domain-level migrations — is inaccessible if either property is unverified, and DNS record verification can take 2–3 days. Export all old-domain URLs from GSC and build a 1:1 redirect mapping spreadsheet. Block the staging environment with both password protection and <meta name="robots" content="noindex"> on every staging page — relying on one mechanism leaves a gap if the other fails before go-live. Site Moves with URL Changes – Google Search Central
Launch day, in order: Remove noindex meta tags from all production pages first. Only then remove staging access controls. Enable 301 redirects from every old URL to its new equivalent — 301 or 308 only, never 302 or 307 for permanent moves. Submit the updated XML sitemap to GSC, then submit the Change of Address form. Spot-check redirect implementation with curl -I on a sampled set of URLs before declaring launch complete.
<Callout type="warning">
302 ≠ 301. Developers often default to 302 because it's reversible. For a permanent migration, a 302 tells Google the move is temporary and blocks ranking signal transfer. Your acceptance criteria must explicitly require 301 or 308 — not accept any 3xx.
</Callout>
The 48-Hour Post-Launch Audit Protocol
Crawl errors, noindex leakage, and soft 404s appear in GSC Coverage within 24–48 hours of go-live and can be corrected before Google re-indexes at scale. After that window, recovery becomes slower and more expensive. The Complete Website Migration Checklist – Semrush
Hour 4: Use GSC URL Inspection on five high-priority pages to confirm Googlebot can access them. Check server logs for 5xx error spikes from Googlebot.
Hour 24: Pull GSC Coverage. A spike in "Excluded by noindex" means noindex tags weren't fully removed — pull the page templates immediately and re-verify.
Hour 48: Run a spot-check crawl starting from the old sitemap. Every old URL must return 301. Any old URL returning 200 is a redirect gap; any new URL returning 200 with thin or error content is a soft 404. Both need tickets created before the crawl session closes.
30-Day GSC Monitoring Plan
Two GSC signals dominate the post-migration monitoring window. The Page Indexing report tracks whether old URLs are being deindexed and new URLs discovered on schedule. If old URLs remain indexed above 80% of their pre-migration count at the two-week mark, verify the Change of Address form was submitted. The Core Web Vitals report catches platform-introduced performance regressions — a new CDN or CMS rendering path can shift LCP significantly without triggering any crawl error.
Monitor daily for the first two weeks, weekly through day 90. At day 30, produce a stakeholder performance summary. Lead with an executive summary readable in under two minutes: what moved, what the organic traffic delta versus baseline is, and whether it falls within expected variance for a migration of this size. Follow with a metrics table — indexed URL count, organic sessions, average position, Core Web Vitals status. Close with open risks and ticket references. Senior stakeholders need ROI framing, not raw crawl error counts. Agile for SEOs – HulkApps
Communicating SEO Risk in Sprint Planning
Passive ticket filing loses to product work every sprint. SEO work submitted to the backlog but not advocated for in planning ceremonies is routinely deprioritized — no matter how well the ticket is written.
Use a four-tier priority taxonomy that maps to engineering severity levels:
- P0 – Block go-live: staging noindex not removed, redirects not implemented, GSC property not verified.
- P1 – This sprint (revenue-impacting): 302→301 fix, Core Web Vitals regression exceeding 500ms. Attach organic traffic dollar value if GA4 supports it.
- P2 – Next sprint (indexation health): canonical mismatches, sitemap errors, crawl budget waste.
- P3 – Roadmap (structural): JavaScript rendering improvements, pagination architecture. Belongs in quarterly planning.
Translate SEO abstractions into the language engineering already uses. "Without canonical tags on paginated hotel search, Google indexes roughly four times the duplicate URL count — same outcome as a sustained cache miss flood on the index" lands differently than "we need canonical tags." P1 issues need a person in the room explaining traffic impact in revenue terms, not a Jira comment.
Hands-On Exercise: Write and Scope a Migration Ticket
Scenario: Your team is migrating a blog from blog.example.com to www.example.com/blog/.
- List five high-priority blog post URLs from
blog.example.comand write their equivalent new URLs in a two-column redirect mapping table. - Write one Jira/Linear ticket for the 301 redirect implementation. Include: a two-sentence problem description with two example URLs, three testable acceptance criteria using
curl -Isyntax, and an impact statement citing the estimated indexed URL count. - Write a sequenced six-item pre-launch checklist. Mark each item as "Developer-dependent" or "SEO-team-executable."
- Draft a two-paragraph executive summary for a 30-day post-migration stakeholder report, leading with traffic retention percentage versus a baseline you define.
Success criteria: Your ticket's acceptance criteria can be verified by a QA engineer using only browser DevTools Network tab and a curl command, with no interpretation required. Your checklist items are sequenced so no step depends on a later step completing first.
This is the final chapter of Technical SEO Fundamentals — you now have the complete workflow from crawlability diagnosis through audit tooling, performance optimization, on-page and structured data, link strategy, and the developer collaboration layer that gets fixes shipped.